Pages

Pecan Pie- Vegan MOFO Day 16

We had a cooking/ baking day at my friend Erin's a few weeks ago, she made pesto, Cindy made the delicious apple caramel slice from veganomicon and also helped with my indecisiveness about what to make by pointing me in the direction of this recipe. Also, helped put the pecans on top and allowed me to use her camera to take this photo. Thanks Cindy! Also Thanks Erin for letting us bake at your place!


Pecan Pie as seen on Swallowed Pride originally from Vegan Cooking - Recipes for Health and Happiness

PASTRY
1 cup rice flour
1 cup almond meal
2 tablespoons raw sugar
1 third cup margarine or coconut oil
2 tablespoons water

Preheat oven to 200c. grease a spring form cake tin, or line with baking paper. combine dry ingredients and rub in the margarine until mixture resembles breadcrumbs. add water and form into a dough. Press dough evenly and firmly to the cake/pie tin so that there's crust on the sides and everything is covered equally. place in the fridge to chill until ready to bake with filling.

FILLING
2 cups dates (220g)
1 cup soy milk
1 cup almond meal
3 tablespoons cornflour
3 tablespoons water
two tablespoons margarine or coconut oil
1.5 cups pecan nuts (150g)

Chop dates in half and place in a saucepan with soy milk. bring to the boil and simmer for 5 minutes. leave to soak for another 5 minutes. puree mixture with a stick blender or food processor. dissolve cornflour in water and add to dates, mix well. mix in almond meal and margarine/oil. leave to cool.
when cooled, spread evenly into pastry base. decorate the top with whole pecans, arranging in circles around the top.

Bake for 35-40 minutes at 200c. Remove from oven and cool

GLAZE:
4 tablespoons rice malt

Melt rice malt in a small saucepan until runny, then pour evenly over pecan pie, you can use a pastry brush for an even finish).


I made a few alterations, using coconut oil which didn't result in the right consistency of the pastry so I added in some regular oil, also I used arrowroot instead of corn starch. I was a bit worried when I tasted the filling that the date flavour would be too strong and that it would taste too healthy, but once it was baked, it was much better and less date-y. However, the crust didn't go quite as plan (maybe due to the oil) it was burnt around the edges and slightly undercooked on the bottom. Overall, though it was quite delicious and I think tasted better the next day, next time I would just stick to margarine. Also, I've never had pecan pie before though, so have nothing to compare it to so not sure how authentic it is!


We had a cooking/ baking day at my friend Erin's a few weeks ago, she made pesto, Cindy made the delicious apple caramel slice from veganomicon and also helped with my indecisiveness about what to make by pointing me in the direction of this recipe. Also, helped put the pecans on top and allowed me to use her camera to take this photo. Thanks Cindy! Also Thanks Erin for letting us bake at your place!


Pecan Pie as seen on Swallowed Pride originally from Vegan Cooking - Recipes for Health and Happiness

PASTRY
1 cup rice flour
1 cup almond meal
2 tablespoons raw sugar
1 third cup margarine or coconut oil
2 tablespoons water

Preheat oven to 200c. grease a spring form cake tin, or line with baking paper. combine dry ingredients and rub in the margarine until mixture resembles breadcrumbs. add water and form into a dough. Press dough evenly and firmly to the cake/pie tin so that there's crust on the sides and everything is covered equally. place in the fridge to chill until ready to bake with filling.

FILLING
2 cups dates (220g)
1 cup soy milk
1 cup almond meal
3 tablespoons cornflour
3 tablespoons water
two tablespoons margarine or coconut oil
1.5 cups pecan nuts (150g)

Chop dates in half and place in a saucepan with soy milk. bring to the boil and simmer for 5 minutes. leave to soak for another 5 minutes. puree mixture with a stick blender or food processor. dissolve cornflour in water and add to dates, mix well. mix in almond meal and margarine/oil. leave to cool.
when cooled, spread evenly into pastry base. decorate the top with whole pecans, arranging in circles around the top.

Bake for 35-40 minutes at 200c. Remove from oven and cool

GLAZE:
4 tablespoons rice malt

Melt rice malt in a small saucepan until runny, then pour evenly over pecan pie, you can use a pastry brush for an even finish).


I made a few alterations, using coconut oil which didn't result in the right consistency of the pastry so I added in some regular oil, also I used arrowroot instead of corn starch. I was a bit worried when I tasted the filling that the date flavour would be too strong and that it would taste too healthy, but once it was baked, it was much better and less date-y. However, the crust didn't go quite as plan (maybe due to the oil) it was burnt around the edges and slightly undercooked on the bottom. Overall, though it was quite delicious and I think tasted better the next day, next time I would just stick to margarine. Also, I've never had pecan pie before though, so have nothing to compare it to so not sure how authentic it is!


reade more... Résuméabuiyad

Gluten Free Apple Pie- Vegan Mofo Day 15

I won some gluten free pies from funky pies about a month ago and have been meaning to post to say that their gf pastry is new and improved particuarly in regards to texture. Then Anikee announced that radical grocery had gluten free apples pies so I raced out to get one. Here is my half with some strawberry ice cream. Toby and I both loved it. The filling was perfect and the pastry kind of resembles whole wheat pastry. We will certainly be buying them again and again!
reade more... Résuméabuiyad

Creamy Corn-Crusted Tempeh Pot Pie - Vegan MOFO Day 14


Tempeh is a totally awesome ingredient to cook with.  I have used it to make the famous tempeh "bacon", my Cantonese style "steak" and Masterchef pressure test stroganoff.  

Last week, I made the Creamy Corn-Crusted Tempeh Pot Pie from Terry Hope Romero's Viva Vegan.  I made a few substitutions and omitted a few ingredients but it still tasted very yummy!  

I don't think I should post the recipe as the author hasn't shared it on-line. It is like the Chilean version of shepherd pie but tastier. We both like the crispy but smooth corn topping a lot!  K doesn't like olives, so I skipped it (and the fresh basil leaves that we don't have).  I also used dried cherries instead of dark raisins (as I couldn't be bothered to go to the shops again).
  
yum
shaved Cheezly for extra awesomeness 


Tempeh is a totally awesome ingredient to cook with.  I have used it to make the famous tempeh "bacon", my Cantonese style "steak" and Masterchef pressure test stroganoff.  

Last week, I made the Creamy Corn-Crusted Tempeh Pot Pie from Terry Hope Romero's Viva Vegan.  I made a few substitutions and omitted a few ingredients but it still tasted very yummy!  

I don't think I should post the recipe as the author hasn't shared it on-line. It is like the Chilean version of shepherd pie but tastier. We both like the crispy but smooth corn topping a lot!  K doesn't like olives, so I skipped it (and the fresh basil leaves that we don't have).  I also used dried cherries instead of dark raisins (as I couldn't be bothered to go to the shops again).
  
yum
shaved Cheezly for extra awesomeness 
reade more... Résuméabuiyad

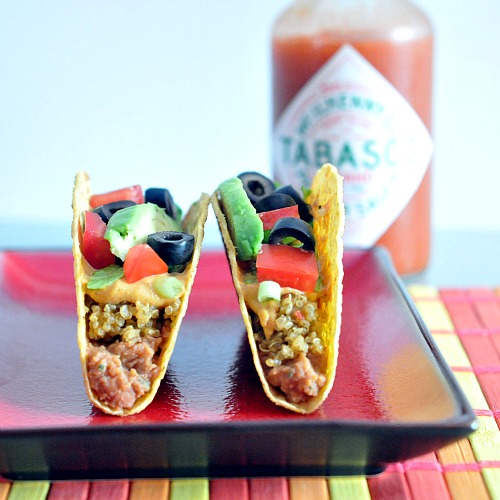
Spabetties Seven Layer Tacos- Vegan MOFO Day 13


It was only a matter of time before I blogged about a recipe from a vegan mofo post as I have been
bookmarking so many new recipes,so many great ideas!

These are delicious, and I love the idea of quinoa in tacos so much more nutritious than my previous tacos. I loved the cashew cheese too. Really need to make cashew cheese more often.

Here is the recipe from xgfx blog, she also has her own blog here.

 Seven layer tacos Ok so technically six, since I omitted the olives.


The Layers:
  1. jalapeno beans
  2. salsa spiced quinoa
  3. noocho cheese sauce
  4. chopped lettuce and scallions
  5. chopped tomatoes
  6. cubed avocado
  7. jalapeno soaked olives
Layer in hard corn taco shells, or in a serving dish as a seven layer dip. I have served these in small bowls as individual dips as well. No measurements for this – make as little or as much as you want, with layers as thick or thin as you want.
Base layer – canned pinto beans (drained) and chopped jalapeno:  2 cans beans and 2 seeded jalapenos, processed in food processor to a blend of chunky/creamy. I also fried this for a few minutes so it was warm and used chilli flakes.
Second layer – salsa spiced quinoa – quinoa cooked with dried and powdered “salsa flavors” added to the water: I used 1 cup quinoa to 1 1/2 cups vegetable broth, I added 1/4 teaspoon onion powder, 1/2 teaspoon garlic powder, 2 teaspoons chili flakes, 1 teaspoon chili powder, bring to boil then simmer 25 minutes.
Third layer – noocho cheese sauce / dip. Recipe follows.
Fourth through seventh layers – layer the lettuce and scallions, then tomato, then avocado, then olives.


This noocho cheese has gained notoriety as well – it is a favorite in our house and many others. A perfect blend of spicy heat, a subtle buttery sweet from cashews, and the cheesy nutritional yeast – my cravings for this border on obsessive.

noocho cheese sauce

vegan, gluten free, dairy free
1 cup raw cashews, soaked
juice of 1 lemon
2 tablespoons Tabasco sauce (we used less as we are wusses when it comes to heat)
1/3 to 1/2 cup water
1 garlic clove, finely minced
1/3 cup nutritional yeast
1/2 teaspoon paprika
1/4 teaspoon chili powder
1/4 teaspoon onion powder
Begin with soaked cashews – process alone to an almost creamy consistency. Add lemon juice, Tabasco and a couple tablespoons of the water – continue processing until smooth. While processing, add garlic, nutritional yeast, paprika, chili and onion powders, stopping to scrape sides. Add water until desired consistency is reached – more water for sauce, less for dip.


It was only a matter of time before I blogged about a recipe from a vegan mofo post as I have been
bookmarking so many new recipes,so many great ideas!

These are delicious, and I love the idea of quinoa in tacos so much more nutritious than my previous tacos. I loved the cashew cheese too. Really need to make cashew cheese more often.

Here is the recipe from xgfx blog, she also has her own blog here.

 Seven layer tacos Ok so technically six, since I omitted the olives.


The Layers:
  1. jalapeno beans
  2. salsa spiced quinoa
  3. noocho cheese sauce
  4. chopped lettuce and scallions
  5. chopped tomatoes
  6. cubed avocado
  7. jalapeno soaked olives
Layer in hard corn taco shells, or in a serving dish as a seven layer dip. I have served these in small bowls as individual dips as well. No measurements for this – make as little or as much as you want, with layers as thick or thin as you want.
Base layer – canned pinto beans (drained) and chopped jalapeno:  2 cans beans and 2 seeded jalapenos, processed in food processor to a blend of chunky/creamy. I also fried this for a few minutes so it was warm and used chilli flakes.
Second layer – salsa spiced quinoa – quinoa cooked with dried and powdered “salsa flavors” added to the water: I used 1 cup quinoa to 1 1/2 cups vegetable broth, I added 1/4 teaspoon onion powder, 1/2 teaspoon garlic powder, 2 teaspoons chili flakes, 1 teaspoon chili powder, bring to boil then simmer 25 minutes.
Third layer – noocho cheese sauce / dip. Recipe follows.
Fourth through seventh layers – layer the lettuce and scallions, then tomato, then avocado, then olives.


This noocho cheese has gained notoriety as well – it is a favorite in our house and many others. A perfect blend of spicy heat, a subtle buttery sweet from cashews, and the cheesy nutritional yeast – my cravings for this border on obsessive.

noocho cheese sauce

vegan, gluten free, dairy free
1 cup raw cashews, soaked
juice of 1 lemon
2 tablespoons Tabasco sauce (we used less as we are wusses when it comes to heat)
1/3 to 1/2 cup water
1 garlic clove, finely minced
1/3 cup nutritional yeast
1/2 teaspoon paprika
1/4 teaspoon chili powder
1/4 teaspoon onion powder
Begin with soaked cashews – process alone to an almost creamy consistency. Add lemon juice, Tabasco and a couple tablespoons of the water – continue processing until smooth. While processing, add garlic, nutritional yeast, paprika, chili and onion powders, stopping to scrape sides. Add water until desired consistency is reached – more water for sauce, less for dip.


reade more... Résuméabuiyad

Jelly Slice-Vegan MOFO Day 12

My nan taught me how to bake and sew and knit and many other things. And while I can't remember how to sew or knit, I definitely remember licking the beaters and helping her grease pans at a very young age. I really can't grease a pan without thinking about her.

Toby and I often talk about how often everyone cries on masterchef which we both think is a little over the top, but I do get that emotional family link. My nan installed my love in baking in me and I'm sure that I have inherited my sweet tooth from her. Every week she would bake us a wide range of cakes, cookies and make various other desserts. Now that I think back to it, I really am in awe of her how much she was able to make without ever tiring of it. She even made me a vegan cake based on an old war time recipe when I first went vegan.

When she passed away, we kept all of her handwritten recipes and I only really tried to veganise her banana cake, which my cousin veganised for our wedding. I swear it tastes the same. Last week would have been her 80th birthday if she was still alive, so our family decided to get together and honour her by making desserts that she used to make. I chose to veganise and de-gluten her jelly slice. but had a few issues at each level. At the base level, when I followed the instructions it was way too oily so I had to add more biscuits. At the lemon layer, I added too much sugar to my own condensed milk and added too much agar so it was too solid and at the jelly layer Toby let it set completely before putting it on top so it just looked ugly when I transferred it.


Base (would half this next time)
220 grams of marie biscuits  2 packets of orgran animal crackers

180 grams melted butter margarine


Combine crushed biscuits and margarine and press 25 x 15cm pan. 


Lemon layer
400 grams condensed milk soy evaporated milk (plus 1 cup sugar)

Juice from 2 lemons
2 tablespoons gelatin dissolved in water 1 tablespoon of agar powder


It was late on a Friday night when I decided to make this, so I couldn't go out and buy vegan condensed milk, so I decided to make my own by combining a can of soy evaporated milk and 1 cup sugar over low heat until sugar was absorbed. I then added the lemon juice and agar powder and stirred until it thickened.  Next time I would use less sugar and less agar.

Allow to cool and then place over base.


Jelly
1 packet of red jelly (I used vitarium red jelly)


Make according to packet instructions and then when almost set place on top of lemon layer. Set in fridge for a few hours and then serve by cutting into small pieces.


 The lemon layer was definitely too hard and the crust a little too thick but despite all of the little issues, I think it actually tasted fine.The jelly kind of brought it all together.


My nan taught me how to bake and sew and knit and many other things. And while I can't remember how to sew or knit, I definitely remember licking the beaters and helping her grease pans at a very young age. I really can't grease a pan without thinking about her.

Toby and I often talk about how often everyone cries on masterchef which we both think is a little over the top, but I do get that emotional family link. My nan installed my love in baking in me and I'm sure that I have inherited my sweet tooth from her. Every week she would bake us a wide range of cakes, cookies and make various other desserts. Now that I think back to it, I really am in awe of her how much she was able to make without ever tiring of it. She even made me a vegan cake based on an old war time recipe when I first went vegan.

When she passed away, we kept all of her handwritten recipes and I only really tried to veganise her banana cake, which my cousin veganised for our wedding. I swear it tastes the same. Last week would have been her 80th birthday if she was still alive, so our family decided to get together and honour her by making desserts that she used to make. I chose to veganise and de-gluten her jelly slice. but had a few issues at each level. At the base level, when I followed the instructions it was way too oily so I had to add more biscuits. At the lemon layer, I added too much sugar to my own condensed milk and added too much agar so it was too solid and at the jelly layer Toby let it set completely before putting it on top so it just looked ugly when I transferred it.


Base (would half this next time)
220 grams of marie biscuits  2 packets of orgran animal crackers

180 grams melted butter margarine


Combine crushed biscuits and margarine and press 25 x 15cm pan. 


Lemon layer
400 grams condensed milk soy evaporated milk (plus 1 cup sugar)

Juice from 2 lemons
2 tablespoons gelatin dissolved in water 1 tablespoon of agar powder


It was late on a Friday night when I decided to make this, so I couldn't go out and buy vegan condensed milk, so I decided to make my own by combining a can of soy evaporated milk and 1 cup sugar over low heat until sugar was absorbed. I then added the lemon juice and agar powder and stirred until it thickened.  Next time I would use less sugar and less agar.

Allow to cool and then place over base.


Jelly
1 packet of red jelly (I used vitarium red jelly)


Make according to packet instructions and then when almost set place on top of lemon layer. Set in fridge for a few hours and then serve by cutting into small pieces.


 The lemon layer was definitely too hard and the crust a little too thick but despite all of the little issues, I think it actually tasted fine.The jelly kind of brought it all together.


reade more... Résuméabuiyad

Homemade honey and pepper vodka


Last year, when we were in Russia, we tasted a whole lot of different vodkas, including some lovely flavoured ones. My favourite was a delicious honey pepper vodka(actually from Ukraine) which had a wonderful piquant sweetness that warmed the throat. But we couldn't find any to bring home and certainly you can't buy it here. So I decided to try making it and by dint of looking up in various Russian cookery books we have, found a sort of recipe--I say sort of because actually it just talked of pepper vodka, and I had to experiment myself with the honey. Anyway I made it and it turned out just wonderfully, and very reminiscent of that Ukrainian tipple!
I used Russian Standard vodka(by far the best vodka you can buy in Australia, in my opinion--it's from St Petersburg and made with the pure cold waters from massive Lake Ladoga)as a base, then added 10 whole black peppercorns, let it steep for 10 days, then after 10 days, strained the vodka, which had now turned a pale brown colour, and added one large tablespoon of Manuka honey(which happens to be my favourite honey), stirred it, and let it steep for another 3 days before drinking it. Great as an after dinner liqueur, though it can also be drunk as an aperitif. (In both cases in shot glasses).

Last year, when we were in Russia, we tasted a whole lot of different vodkas, including some lovely flavoured ones. My favourite was a delicious honey pepper vodka(actually from Ukraine) which had a wonderful piquant sweetness that warmed the throat. But we couldn't find any to bring home and certainly you can't buy it here. So I decided to try making it and by dint of looking up in various Russian cookery books we have, found a sort of recipe--I say sort of because actually it just talked of pepper vodka, and I had to experiment myself with the honey. Anyway I made it and it turned out just wonderfully, and very reminiscent of that Ukrainian tipple!
I used Russian Standard vodka(by far the best vodka you can buy in Australia, in my opinion--it's from St Petersburg and made with the pure cold waters from massive Lake Ladoga)as a base, then added 10 whole black peppercorns, let it steep for 10 days, then after 10 days, strained the vodka, which had now turned a pale brown colour, and added one large tablespoon of Manuka honey(which happens to be my favourite honey), stirred it, and let it steep for another 3 days before drinking it. Great as an after dinner liqueur, though it can also be drunk as an aperitif. (In both cases in shot glasses).
reade more... Résuméabuiyad

Two Fun Ways to Combine Apples and Peanut Butter-Vegan MOFO Day 11

The inspiration for both of these, come from Pinterest. Is anyone else using it? I'm so addicted! It's a bookmarking tool but is unique in that you see pictures instead of words and by following others you can also see what they pin. So it tends to expose me to ideas, products and recipe ideas that I might not normally see.

Apple sandwich I think the original idea come from wholefoods

The first idea is to make a sandwich out of an apple, by coring it and then cutting into1/2 inch thick rounds, put a generous amount of peanut butter, choc chips, granola etc on one side and press down with the other piece. I left out the granola because I didn't have any. I wasn't sure about the choc chips but loved the peanut butter with it.

The second idea is a caramel filled apple. I got the idea to pair it with peanut butter caramel after trying Cindy's apple peanut butter crumble slice, which is originally from veganomicon.

Peanut butter caramel: (this fills 1 med apple so multiple accordingly)
1/6 cup of peanut butter
1 and 1/2 half tablespoon maple syrup

Melt together the peanut butter and maple syrup in a small saucepan. Whisk them until they're well combined.

Caramel Filled Apples- which I think originates from lilyshop.
Cut the top of your apple off and set aside. Scoop out the body of the apple with a melon baller or knife and fill with melted caramel. Use apple piece to dip inside.

TIP: Dab lemon juice on the rim of the apple as well as the "lid" of the apple so it doesn't turn brown as soon as possible. 

I made these a week apart so it is a pure coincidence that I used the same plate each time.
This was great, the caramel was nice and warm but not burning my mouth and great comfort food. I strongly recommend it.
The inspiration for both of these, come from Pinterest. Is anyone else using it? I'm so addicted! It's a bookmarking tool but is unique in that you see pictures instead of words and by following others you can also see what they pin. So it tends to expose me to ideas, products and recipe ideas that I might not normally see.

Apple sandwich I think the original idea come from wholefoods

The first idea is to make a sandwich out of an apple, by coring it and then cutting into1/2 inch thick rounds, put a generous amount of peanut butter, choc chips, granola etc on one side and press down with the other piece. I left out the granola because I didn't have any. I wasn't sure about the choc chips but loved the peanut butter with it.

The second idea is a caramel filled apple. I got the idea to pair it with peanut butter caramel after trying Cindy's apple peanut butter crumble slice, which is originally from veganomicon.

Peanut butter caramel: (this fills 1 med apple so multiple accordingly)
1/6 cup of peanut butter
1 and 1/2 half tablespoon maple syrup

Melt together the peanut butter and maple syrup in a small saucepan. Whisk them until they're well combined.

Caramel Filled Apples- which I think originates from lilyshop.
Cut the top of your apple off and set aside. Scoop out the body of the apple with a melon baller or knife and fill with melted caramel. Use apple piece to dip inside.

TIP: Dab lemon juice on the rim of the apple as well as the "lid" of the apple so it doesn't turn brown as soon as possible. 

I made these a week apart so it is a pure coincidence that I used the same plate each time.
This was great, the caramel was nice and warm but not burning my mouth and great comfort food. I strongly recommend it.
reade more... Résuméabuiyad