Pages

Showing posts with label mains. Show all posts

Quinoa Croquettes


I've been making these croquettes a lot lately, I never use black eyed beans though, and substitute whatever I have on hand so far I've tried kidney beans, chickpeas and cannelloni beans. They are so versitile too, each time we have served them in a different way, one night we had them with pasta and tomato based sauce and a cheesy sauce, another night with mashed potatoes and gravy and last night we took them to a potluck with a tangy dipping sauce. They freeze really well too. I recommend doubling or tripling this recipe and freezing what you don't need.

Black-eyed Pea and Quinoa Croquettes from vegan with a vengeance

1 1/2 cups cooked black-eyed peas, drained, or 1 can, drained and rinsed

1 tbsp olive oil

1 tbsp soy sauce

1 cup cooked quinoa, at room temperature

1/2 tsp dried thyme

1/2 tsp dried basil

1 tsp paprika

For the bread crumb coating:

1/2 cup bread crumbs (I used gf breadcrumbs)

1/8 tsp sea salt

Few dashes of black pepper

1/2 tsp finely grated lemon zest

2 tsp olive oil


1.

Preheat the oven to 170°C (350°F) degrees. Mash the black-eyed peas (or whatever beans you subsitute) and combine with the olive oil and soy sauce until just blended. I made it with food processor last night but they become too soft. Add the quinoa and spices and combine the mixture. You should be able to mould them into balls that readily stick together.

2.

In a small bowl, mix together all the ingredients for the breading. Spray a baking pan with a little oil. Form the croquettes into walnut-sized balls. Gently roll the balls between your palms 3-4 times, then flatten out the ends so that the croquettes resemble marshmallows. Coat each ball with the bread crumbs and place on the baking sheet. When all the croquettes have been formed, spray lightly with oil. Bake for 40 minutes, turning once after 20 minutes.

Excuse this slightly blurry pic


I've been making these croquettes a lot lately, I never use black eyed beans though, and substitute whatever I have on hand so far I've tried kidney beans, chickpeas and cannelloni beans. They are so versitile too, each time we have served them in a different way, one night we had them with pasta and tomato based sauce and a cheesy sauce, another night with mashed potatoes and gravy and last night we took them to a potluck with a tangy dipping sauce. They freeze really well too. I recommend doubling or tripling this recipe and freezing what you don't need.

Black-eyed Pea and Quinoa Croquettes from vegan with a vengeance

1 1/2 cups cooked black-eyed peas, drained, or 1 can, drained and rinsed

1 tbsp olive oil

1 tbsp soy sauce

1 cup cooked quinoa, at room temperature

1/2 tsp dried thyme

1/2 tsp dried basil

1 tsp paprika

For the bread crumb coating:

1/2 cup bread crumbs (I used gf breadcrumbs)

1/8 tsp sea salt

Few dashes of black pepper

1/2 tsp finely grated lemon zest

2 tsp olive oil


1.

Preheat the oven to 170°C (350°F) degrees. Mash the black-eyed peas (or whatever beans you subsitute) and combine with the olive oil and soy sauce until just blended. I made it with food processor last night but they become too soft. Add the quinoa and spices and combine the mixture. You should be able to mould them into balls that readily stick together.

2.

In a small bowl, mix together all the ingredients for the breading. Spray a baking pan with a little oil. Form the croquettes into walnut-sized balls. Gently roll the balls between your palms 3-4 times, then flatten out the ends so that the croquettes resemble marshmallows. Coat each ball with the bread crumbs and place on the baking sheet. When all the croquettes have been formed, spray lightly with oil. Bake for 40 minutes, turning once after 20 minutes.

Excuse this slightly blurry pic


reade more... Résuméabuiyad

"Battered" Fried Chickpeas


Excuse these horrible photos!

I've tried a few times to make baked chickpeas like the ones you can buy in the supermarket, but they always end up a soggy dissapointment. Thankfully I've found a way around it. These pan fried chickpeas are not as crunchy but they have a slightly crisp outer shell and still remain soft inside. I actually prefer the texture of these. I've made them several times and each time adapt the seasoning to include garlic powder, onion powder, and smoked paprika. I normally serve it with some gluten free pasta, basic lemon-olive oil dressing and some cheezy and some veggies (broccoli thrown into pasta water). Its a pretty fast weeknight meal if you used canned chickpeas.

"Battered” Fried Chickpeas from Oh She Glows
Yield: 1.5 cups (I normally make a triple batch)

Ingredients:

    1 tbsp oil
    1 (15-oz or 450gram) can chickpeas, drained and rinsed
    2-2.5 tbsp nutritional yeast
    1/4 tsp garlic powder
    1/4 tsp Herbamare (or use kosher salt)
    freshly ground black pepper, to taste
    Pinch of cayenne pepper, optional

1. Heat 1 tbsp oil in a medium-sized skillet over medium heat.

2. Meanwhile, drain and rinse the chickpeas. When the skillet has pre-heated (chickpeas should sizzle on it), carefully add the drained chickpeas to the skillet. Be very careful as they will sizzle and crackle in the oil and it may splash you.

3. Fry the chickpeas, stirring every 20 seconds or so, over medium heat. After a few minutes, stir in the rest of the ingredients to taste. The chickpeas will have a thin coating on them. Fry for about 5-6 more minutes, stirring frequently and making sure they don’t burn. If they are starting to burn, reduce heat. They should be golden and lightly charred in some parts.

Rilakkuma liked them too

Excuse these horrible photos!

I've tried a few times to make baked chickpeas like the ones you can buy in the supermarket, but they always end up a soggy dissapointment. Thankfully I've found a way around it. These pan fried chickpeas are not as crunchy but they have a slightly crisp outer shell and still remain soft inside. I actually prefer the texture of these. I've made them several times and each time adapt the seasoning to include garlic powder, onion powder, and smoked paprika. I normally serve it with some gluten free pasta, basic lemon-olive oil dressing and some cheezy and some veggies (broccoli thrown into pasta water). Its a pretty fast weeknight meal if you used canned chickpeas.

"Battered” Fried Chickpeas from Oh She Glows
Yield: 1.5 cups (I normally make a triple batch)

Ingredients:

    1 tbsp oil
    1 (15-oz or 450gram) can chickpeas, drained and rinsed
    2-2.5 tbsp nutritional yeast
    1/4 tsp garlic powder
    1/4 tsp Herbamare (or use kosher salt)
    freshly ground black pepper, to taste
    Pinch of cayenne pepper, optional

1. Heat 1 tbsp oil in a medium-sized skillet over medium heat.

2. Meanwhile, drain and rinse the chickpeas. When the skillet has pre-heated (chickpeas should sizzle on it), carefully add the drained chickpeas to the skillet. Be very careful as they will sizzle and crackle in the oil and it may splash you.

3. Fry the chickpeas, stirring every 20 seconds or so, over medium heat. After a few minutes, stir in the rest of the ingredients to taste. The chickpeas will have a thin coating on them. Fry for about 5-6 more minutes, stirring frequently and making sure they don’t burn. If they are starting to burn, reduce heat. They should be golden and lightly charred in some parts.

Rilakkuma liked them too
reade more... Résuméabuiyad

Salt and Pepper Tofu


For the last month, I've been addicted to salt and pepper tofu, have been making it about every 10 days and even eating it out (more on that later). I generally serve mine with white rice and whatever veggies I have on hand. I shallow fry it but it still not super healthy but it's oh so delicious. The pepper really helps warm you up on these cold days too. Here is my rough recipe, feel free to play around with the salt and pepper ratio.

Salt and Pepper Tofu adapted by indolent cook:

450g firm tofu
4 tablespoons of corn starch (i've also used a combo of potato flour, will try rice flour next)
1 teaspoon fine sea salt
1/4 teaspoon ground white pepper
1/2 teaspoon ground black pepper

1/2 teaspoon of ground sichuan pepper (I think this really makes the dish)
oil, for frying
3 spring onions, chopped
soy sauce (optional-for extra flavour on your rice)
rice vinegar (optional-for extra flavour on your rice)

Drain tofu and cut tofu into cubes of 2 - 2.5 centimetres. Mix the salt and peppers together. Add half of the salt and pepper to the corn starch.  Put remaining aside.

Toss tofu cubes through the flour blend, making sure they are coated on all sides. Divide into a few batches depending on the size of your frypan.

Pour oil into a small frying pan so that there is no space. Let the oil warm rapidly over high heat for about 30 seconds, then fry the coated tofu cubes a batch at a time, turning, until golden and crispy on all sides. Add remaining salt and pepper to it and fry for another minute.

Retrieve the tofu and drain off excess oil on paper towels.

Put a tiny bit of soy sauce and rice vinegar on your bowl of plain rice, add tofu (and veggies) and top with spring onions.


For the last month, I've been addicted to salt and pepper tofu, have been making it about every 10 days and even eating it out (more on that later). I generally serve mine with white rice and whatever veggies I have on hand. I shallow fry it but it still not super healthy but it's oh so delicious. The pepper really helps warm you up on these cold days too. Here is my rough recipe, feel free to play around with the salt and pepper ratio.

Salt and Pepper Tofu adapted by indolent cook:

450g firm tofu
4 tablespoons of corn starch (i've also used a combo of potato flour, will try rice flour next)
1 teaspoon fine sea salt
1/4 teaspoon ground white pepper
1/2 teaspoon ground black pepper

1/2 teaspoon of ground sichuan pepper (I think this really makes the dish)
oil, for frying
3 spring onions, chopped
soy sauce (optional-for extra flavour on your rice)
rice vinegar (optional-for extra flavour on your rice)

Drain tofu and cut tofu into cubes of 2 - 2.5 centimetres. Mix the salt and peppers together. Add half of the salt and pepper to the corn starch.  Put remaining aside.

Toss tofu cubes through the flour blend, making sure they are coated on all sides. Divide into a few batches depending on the size of your frypan.

Pour oil into a small frying pan so that there is no space. Let the oil warm rapidly over high heat for about 30 seconds, then fry the coated tofu cubes a batch at a time, turning, until golden and crispy on all sides. Add remaining salt and pepper to it and fry for another minute.

Retrieve the tofu and drain off excess oil on paper towels.

Put a tiny bit of soy sauce and rice vinegar on your bowl of plain rice, add tofu (and veggies) and top with spring onions.

reade more... Résuméabuiyad

Arepas

'Easy' is probably one of the most common words used in this blog, along with noodles, ice cream and dessert because most of the dishes we make tend to be easy dishes which don't take hours and aren't fiddly to make. Except for maybe the few decorated cakes. This dish really surprised me because I didn't expect it to be easy.

I had areapas in san francisco once and enjoyed them and looked at the recipe in viva vegan but thought it sounded like too much word so avoided making them until a few weeks ago. I once tried to make pupusas but found them too be too fiddly but these are completely different. So easy and are quicker to make than corn tortillas.

But better yet they have act as a great glutenfree bun type alternative.  Ivan pointed out that they are almost like english muffins, slighty hard on the outside and soft iside. So I'm also considering making these again with tofu benedict.

I filled mine with our regular chilli, cheddar cheezly and quacamole. Not sharing the recipe, since I've already posted a few from viva vegan here and you should go get the book you cheap skate. I also tried the corn and cheese filled variety minus the cheese but found that the corn kept getting burnt so prefer the plain variety.

'Easy' is probably one of the most common words used in this blog, along with noodles, ice cream and dessert because most of the dishes we make tend to be easy dishes which don't take hours and aren't fiddly to make. Except for maybe the few decorated cakes. This dish really surprised me because I didn't expect it to be easy.

I had areapas in san francisco once and enjoyed them and looked at the recipe in viva vegan but thought it sounded like too much word so avoided making them until a few weeks ago. I once tried to make pupusas but found them too be too fiddly but these are completely different. So easy and are quicker to make than corn tortillas.

But better yet they have act as a great glutenfree bun type alternative.  Ivan pointed out that they are almost like english muffins, slighty hard on the outside and soft iside. So I'm also considering making these again with tofu benedict.

I filled mine with our regular chilli, cheddar cheezly and quacamole. Not sharing the recipe, since I've already posted a few from viva vegan here and you should go get the book you cheap skate. I also tried the corn and cheese filled variety minus the cheese but found that the corn kept getting burnt so prefer the plain variety.

reade more... Résuméabuiyad

Shake and Bake Tofu

Sometimes the best ideas come out of failed recipes. I tried to follow recipe from don't feed the bears 2 as seen on  Cake Maker to the Stars a few weeks ago. Sadly my attempt at roux kind of sucked and I didn't know how to get the right seasoning but I come up with another idea for tofu. This recipe involves breading tofu. I followed the recipe but used a mix of cajun and nooch but after breading several thought this must be an quicker way. Putting them in a ziplock bag and shaking was actually fun. It's not a completely original idea as I saw another blog do the same thing about a week after I made it but I recommend giving it a go. Here is the loose recipe:

Shake and Bake Tofu
1 container of tofu, drained
About a tablespoon of soy sauce (gluten free of course)
Use a ratio of 3 tablespoons of nooch-1 tablespoon cajun spices until all tofu is covered


Preheat oven to 175 degrees C (350 F).

Brush baking sheet with oil.

Cut Tofu into cubes, then add soy sauce until all covered. Put a large handful of tofu, nooch and cajun spices into zip lock bag and shake til it is evenly covered. Then repeat, until all covered.

Place in tray and bake in oven for approximately 30 minutes, turning about half way through until quite crispy.


Here is it prebaked. 
 

I think it could work well in a range of dishes. We had similar noochy tofu in a stir fry in Portland. This didn't last long at our household with Toby and I served it with rice and dipped some in mayo and sweet chilli sauce, so damn additive.
Sometimes the best ideas come out of failed recipes. I tried to follow recipe from don't feed the bears 2 as seen on  Cake Maker to the Stars a few weeks ago. Sadly my attempt at roux kind of sucked and I didn't know how to get the right seasoning but I come up with another idea for tofu. This recipe involves breading tofu. I followed the recipe but used a mix of cajun and nooch but after breading several thought this must be an quicker way. Putting them in a ziplock bag and shaking was actually fun. It's not a completely original idea as I saw another blog do the same thing about a week after I made it but I recommend giving it a go. Here is the loose recipe:

Shake and Bake Tofu
1 container of tofu, drained
About a tablespoon of soy sauce (gluten free of course)
Use a ratio of 3 tablespoons of nooch-1 tablespoon cajun spices until all tofu is covered


Preheat oven to 175 degrees C (350 F).

Brush baking sheet with oil.

Cut Tofu into cubes, then add soy sauce until all covered. Put a large handful of tofu, nooch and cajun spices into zip lock bag and shake til it is evenly covered. Then repeat, until all covered.

Place in tray and bake in oven for approximately 30 minutes, turning about half way through until quite crispy.


Here is it prebaked. 
 

I think it could work well in a range of dishes. We had similar noochy tofu in a stir fry in Portland. This didn't last long at our household with Toby and I served it with rice and dipped some in mayo and sweet chilli sauce, so damn additive.
reade more... Résuméabuiyad

Kimchi Noodles

I'm sure this isn't authentic at all but it was a quick and tasty dish which was very loosely inspired from meet me at mikes kimchi salad.

Kimchi Noodles
serves 4-6 (4 for us because Toby is a massive eater)

1 package of sweet potato noodles
2 cups chopped kimchi
1 Tablespoon lime juice
2 T soy sauce plus splash of soy
2 Packets of Fried Tofu, chopped
1/2 T vinegar
1/2 T sugar
handful of fried onions -the ones you get from asian supermarket in a packet (optional)

Boil water, cook noodles until tender about 8 minutes. Strain noodles.

Stir fry tofu with splash of soy sauce. Add in kimchi, vinegar and sugar and cook for a few more minutes. Mix in tofu/kimchi to noodles and add lime juice and soy sauce. Stir and serve with some fried onions sprinkled on top. I am addicted to fried onions at the moment!

Toby and I was quiet pleased with this dish, and will certainly be making it again. It's a great weeknight dinner and is slightly salty, sour and spicy.

Am still looking for Korean inspired dessert recipes, any suggestions?
I'm sure this isn't authentic at all but it was a quick and tasty dish which was very loosely inspired from meet me at mikes kimchi salad.

Kimchi Noodles
serves 4-6 (4 for us because Toby is a massive eater)

1 package of sweet potato noodles
2 cups chopped kimchi
1 Tablespoon lime juice
2 T soy sauce plus splash of soy
2 Packets of Fried Tofu, chopped
1/2 T vinegar
1/2 T sugar
handful of fried onions -the ones you get from asian supermarket in a packet (optional)

Boil water, cook noodles until tender about 8 minutes. Strain noodles.

Stir fry tofu with splash of soy sauce. Add in kimchi, vinegar and sugar and cook for a few more minutes. Mix in tofu/kimchi to noodles and add lime juice and soy sauce. Stir and serve with some fried onions sprinkled on top. I am addicted to fried onions at the moment!

Toby and I was quiet pleased with this dish, and will certainly be making it again. It's a great weeknight dinner and is slightly salty, sour and spicy.

Am still looking for Korean inspired dessert recipes, any suggestions?
reade more... Résuméabuiyad

Simon's Vegan Laksa - Vegan MOFO Day 28

We came across this vegan Laksa recipe from the The Cook And The Chef  (You can see the youtube video of the episode here.) and I decided to take on the challenge of making my own Laksa paste! You know, making something form scratch is pretty satisfying sometimes.  

I substituted a few things on the recipe that I couldn't find (I also forgot to grab a lime form the shop and there were none at any supermarkets in Brunswick!!!!).  Instead of using Kaffir lime zest in the paste, I put Kaffir lime leaves in the soup.

Paste
2 teaspoon vegetarian blachan Mighty Mite
2 medium onions, chopped
2 cloves garlic
1 kaffir lime, zested (I use 3 kaffir lime leaves in the soup instead)
2 stalks lemongrass, finely sliced
1 tablespoon chopped galangal ginger
1 teaspoon turmeric, chopped turmeric powder
2 dried red chillies, deseeded and soaked 2 teaspoon red chillie flakes
30g macadamia nuts
1 tablespoon coriander seeds, roasted and ground powder
1 teaspoon turmeric powder
3 coriander roots
80ml peanut oil olive oil, 50ml for the paste, 30ml for frying

Soup
½ small bunch coriander leaves
1 packet Hokkien noodles, egg free rice noodles (500g)
1 bunch Vietnamese mint (rau raum)
300ml coconut milk (Chef's Choice)
600ml vegetable stock
2 limes, juiced 1/4 cup lime juice
1 bok choy, cut into ¼ lengthways
1 small  packet fried tofu (Yenson), cut into chunky slices
Thai seasoned soy sauce Chang's GF soy sauce to taste
2 teaspoons crispy shallot
Bean sprouts
3 red chillies, sliced red chillie flakes

Method

Blend all the paste ingredients in a blender until it becomes a smooth paste. This can be frozen, kept in a sealed jar or cooked for laksa soup.

Heat 30ml of oil in a saucepan and add about four tablespoons of the laksa paste. Fry until fragrant. Add coconut milk (and 3 Lime Leaves) and simmer for 10 minutes. Add the stock and simmer for 15 minutes. Add bok choy and tofu and simmer for a few minutes. Season with Thai soy sauce GF soy sauce and lime juice.


Pour hot water over the hokkien noodles Cook rice noodle in a pot. Drain. Place heated noodles in serving bowls. Pour soup over noodles, making sure every bowl gets bok choy and tofu. Garnish with fresh chilli flakes, bean sprouts, coriander, crispy shallots and a little zested kaffir lime.

I reckon it tasted pretty damn good and authentic.  Not too hard to make too.

We came across this vegan Laksa recipe from the The Cook And The Chef  (You can see the youtube video of the episode here.) and I decided to take on the challenge of making my own Laksa paste! You know, making something form scratch is pretty satisfying sometimes.  

I substituted a few things on the recipe that I couldn't find (I also forgot to grab a lime form the shop and there were none at any supermarkets in Brunswick!!!!).  Instead of using Kaffir lime zest in the paste, I put Kaffir lime leaves in the soup.

Paste
2 teaspoon vegetarian blachan Mighty Mite
2 medium onions, chopped
2 cloves garlic
1 kaffir lime, zested (I use 3 kaffir lime leaves in the soup instead)
2 stalks lemongrass, finely sliced
1 tablespoon chopped galangal ginger
1 teaspoon turmeric, chopped turmeric powder
2 dried red chillies, deseeded and soaked 2 teaspoon red chillie flakes
30g macadamia nuts
1 tablespoon coriander seeds, roasted and ground powder
1 teaspoon turmeric powder
3 coriander roots
80ml peanut oil olive oil, 50ml for the paste, 30ml for frying

Soup
½ small bunch coriander leaves
1 packet Hokkien noodles, egg free rice noodles (500g)
1 bunch Vietnamese mint (rau raum)
300ml coconut milk (Chef's Choice)
600ml vegetable stock
2 limes, juiced 1/4 cup lime juice
1 bok choy, cut into ¼ lengthways
1 small  packet fried tofu (Yenson), cut into chunky slices
Thai seasoned soy sauce Chang's GF soy sauce to taste
2 teaspoons crispy shallot
Bean sprouts
3 red chillies, sliced red chillie flakes

Method

Blend all the paste ingredients in a blender until it becomes a smooth paste. This can be frozen, kept in a sealed jar or cooked for laksa soup.

Heat 30ml of oil in a saucepan and add about four tablespoons of the laksa paste. Fry until fragrant. Add coconut milk (and 3 Lime Leaves) and simmer for 10 minutes. Add the stock and simmer for 15 minutes. Add bok choy and tofu and simmer for a few minutes. Season with Thai soy sauce GF soy sauce and lime juice.


Pour hot water over the hokkien noodles Cook rice noodle in a pot. Drain. Place heated noodles in serving bowls. Pour soup over noodles, making sure every bowl gets bok choy and tofu. Garnish with fresh chilli flakes, bean sprouts, coriander, crispy shallots and a little zested kaffir lime.

I reckon it tasted pretty damn good and authentic.  Not too hard to make too.

reade more... Résuméabuiyad

Lemon "cavier" pasta and Liebster Award- Vegan MOFO Day 24

IKEA has vegan cavier. Yes I kid you not!!!!! It's only a few dollars and surprisingly it tastes good. I'm not a fan of fish even when I used to eat it or mock fishy things but it is quite subtle with a slightly salty flavour. I've never had cavier before so didn't know what to do with it so I followed this recipe which was super easy. We also added a can of white beans and some baby spinach to make it a complete meal.

Lemon "Cavier" Pasta by If Martha was Veg

Servings:4

Ingredients:
Olive oil
1 bag of spaghetti (16 oz) 1 pack of gluten free pasta

1 stick of butter   1 Tablespoon of Margarine
3 lemons (2 to zest & juice for the pasta & 1 to slice very thinly to fry up)
Tangkorn aka vegan caviar from Ikea
1/4 cup of flour chickpea flour
Garlic powder
Vegetable oil
Salt & pepper to taste

While your water is boiling & your pasta is cooking, you can fry up your lemon slices.
In a small bowl, add your flour, salt, pepper and garlic powder and mix. Coat your thinly sliced lemon slices in the mixture and in a pan, heat up some vegetable oil. Throw your lemon slices & and let them get brown & crispy!

When you’ve put together your pasta & caviar dish, add your crispy lemons and enjoy!

Unfortunately I lost my pictures of the meal, and while it tasted great and is worth making again, I don't have time to go to Ikea get more and make it again because this is vegan mofo and I'm trying to blog every day. So Instead I have these photos of the ingredients.


Zuckerbaby over at Tales of a Vegan Food Fetishist, has nominated me for the Liebster Award. I've watched a few aussie bloggers get the award and didn't think our blog was going to get nominated so was very pleasantly surprised thanks. Zuckerbaby has an amazing vegan dessert cookbook and will be bringing out a pie themed book with plenty of gluten free options.


“Liebster” is German and means ‘dearest’ or ‘beloved’ but it can also mean ‘favorite’. The idea behind this award is to bring attention to bloggers who have less than 200 followers and show your support during Vegan Mofo!

The rules of winning this award are as follows:
1. Show your thanks to those who gave you the award by linking back to them.
2. Reveal 5 of your top picks and let them know by leaving a comment on their blog.
3. Post the award on your blog.
4. Enjoy the love and support of some wonderful people on the www!

I doubt these bloggers have less than 200 followers but are just blogs that I have been enjoying reading during mofo, also I tried to choose blogs which I don't think have already been chosen:

1. Green Gourmet Giraffe, Johanna is vegetarian but has been posting amazing vegan food every day for vegan mofo, also I got to try some of it and it was damn tasty. Shes also the best commenter too not just here by on so many blogs, I don't know how she finds the time, but I think its so awesome.
2. Cake Maker to the Stars Kittee is like my xgfx hero, and while I didn't get to meet up with her in Portland, I did run into her in herbivore which was quite exciting. She's behind xgfx site too.
3. Louise by Degrees Louise is a fellow Melbournian too, her blog is quite new but really colourful, check out the heart shaped strawberries in her muffins.
4. Spabettie could easily be nominated for just her balsamic strawberry ice cream but she has lots of other yummy and inspiring recipes too.
5. Green Vegan Living- Geanna is super friendly fellow gluten free blogger who I did get to meet when I was in Portland, I love reading about what she does with her csa fruit and vegies each week.


 Only a week to go!!!
IKEA has vegan cavier. Yes I kid you not!!!!! It's only a few dollars and surprisingly it tastes good. I'm not a fan of fish even when I used to eat it or mock fishy things but it is quite subtle with a slightly salty flavour. I've never had cavier before so didn't know what to do with it so I followed this recipe which was super easy. We also added a can of white beans and some baby spinach to make it a complete meal.

Lemon "Cavier" Pasta by If Martha was Veg

Servings:4

Ingredients:
Olive oil
1 bag of spaghetti (16 oz) 1 pack of gluten free pasta

1 stick of butter   1 Tablespoon of Margarine
3 lemons (2 to zest & juice for the pasta & 1 to slice very thinly to fry up)
Tangkorn aka vegan caviar from Ikea
1/4 cup of flour chickpea flour
Garlic powder
Vegetable oil
Salt & pepper to taste

While your water is boiling & your pasta is cooking, you can fry up your lemon slices.
In a small bowl, add your flour, salt, pepper and garlic powder and mix. Coat your thinly sliced lemon slices in the mixture and in a pan, heat up some vegetable oil. Throw your lemon slices & and let them get brown & crispy!

When you’ve put together your pasta & caviar dish, add your crispy lemons and enjoy!

Unfortunately I lost my pictures of the meal, and while it tasted great and is worth making again, I don't have time to go to Ikea get more and make it again because this is vegan mofo and I'm trying to blog every day. So Instead I have these photos of the ingredients.


Zuckerbaby over at Tales of a Vegan Food Fetishist, has nominated me for the Liebster Award. I've watched a few aussie bloggers get the award and didn't think our blog was going to get nominated so was very pleasantly surprised thanks. Zuckerbaby has an amazing vegan dessert cookbook and will be bringing out a pie themed book with plenty of gluten free options.


“Liebster” is German and means ‘dearest’ or ‘beloved’ but it can also mean ‘favorite’. The idea behind this award is to bring attention to bloggers who have less than 200 followers and show your support during Vegan Mofo!

The rules of winning this award are as follows:
1. Show your thanks to those who gave you the award by linking back to them.
2. Reveal 5 of your top picks and let them know by leaving a comment on their blog.
3. Post the award on your blog.
4. Enjoy the love and support of some wonderful people on the www!

I doubt these bloggers have less than 200 followers but are just blogs that I have been enjoying reading during mofo, also I tried to choose blogs which I don't think have already been chosen:

1. Green Gourmet Giraffe, Johanna is vegetarian but has been posting amazing vegan food every day for vegan mofo, also I got to try some of it and it was damn tasty. Shes also the best commenter too not just here by on so many blogs, I don't know how she finds the time, but I think its so awesome.
2. Cake Maker to the Stars Kittee is like my xgfx hero, and while I didn't get to meet up with her in Portland, I did run into her in herbivore which was quite exciting. She's behind xgfx site too.
3. Louise by Degrees Louise is a fellow Melbournian too, her blog is quite new but really colourful, check out the heart shaped strawberries in her muffins.
4. Spabettie could easily be nominated for just her balsamic strawberry ice cream but she has lots of other yummy and inspiring recipes too.
5. Green Vegan Living- Geanna is super friendly fellow gluten free blogger who I did get to meet when I was in Portland, I love reading about what she does with her csa fruit and vegies each week.


 Only a week to go!!!
reade more... Résuméabuiyad

Creamy Corn-Crusted Tempeh Pot Pie - Vegan MOFO Day 14


Tempeh is a totally awesome ingredient to cook with.  I have used it to make the famous tempeh "bacon", my Cantonese style "steak" and Masterchef pressure test stroganoff.  

Last week, I made the Creamy Corn-Crusted Tempeh Pot Pie from Terry Hope Romero's Viva Vegan.  I made a few substitutions and omitted a few ingredients but it still tasted very yummy!  

I don't think I should post the recipe as the author hasn't shared it on-line. It is like the Chilean version of shepherd pie but tastier. We both like the crispy but smooth corn topping a lot!  K doesn't like olives, so I skipped it (and the fresh basil leaves that we don't have).  I also used dried cherries instead of dark raisins (as I couldn't be bothered to go to the shops again).
  
yum
shaved Cheezly for extra awesomeness 


Tempeh is a totally awesome ingredient to cook with.  I have used it to make the famous tempeh "bacon", my Cantonese style "steak" and Masterchef pressure test stroganoff.  

Last week, I made the Creamy Corn-Crusted Tempeh Pot Pie from Terry Hope Romero's Viva Vegan.  I made a few substitutions and omitted a few ingredients but it still tasted very yummy!  

I don't think I should post the recipe as the author hasn't shared it on-line. It is like the Chilean version of shepherd pie but tastier. We both like the crispy but smooth corn topping a lot!  K doesn't like olives, so I skipped it (and the fresh basil leaves that we don't have).  I also used dried cherries instead of dark raisins (as I couldn't be bothered to go to the shops again).
  
yum
shaved Cheezly for extra awesomeness 
reade more... Résuméabuiyad

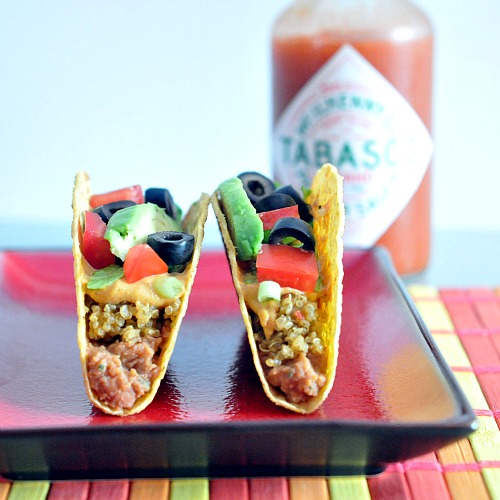
Spabetties Seven Layer Tacos- Vegan MOFO Day 13


It was only a matter of time before I blogged about a recipe from a vegan mofo post as I have been
bookmarking so many new recipes,so many great ideas!

These are delicious, and I love the idea of quinoa in tacos so much more nutritious than my previous tacos. I loved the cashew cheese too. Really need to make cashew cheese more often.

Here is the recipe from xgfx blog, she also has her own blog here.

 Seven layer tacos Ok so technically six, since I omitted the olives.


The Layers:
  1. jalapeno beans
  2. salsa spiced quinoa
  3. noocho cheese sauce
  4. chopped lettuce and scallions
  5. chopped tomatoes
  6. cubed avocado
  7. jalapeno soaked olives
Layer in hard corn taco shells, or in a serving dish as a seven layer dip. I have served these in small bowls as individual dips as well. No measurements for this – make as little or as much as you want, with layers as thick or thin as you want.
Base layer – canned pinto beans (drained) and chopped jalapeno:  2 cans beans and 2 seeded jalapenos, processed in food processor to a blend of chunky/creamy. I also fried this for a few minutes so it was warm and used chilli flakes.
Second layer – salsa spiced quinoa – quinoa cooked with dried and powdered “salsa flavors” added to the water: I used 1 cup quinoa to 1 1/2 cups vegetable broth, I added 1/4 teaspoon onion powder, 1/2 teaspoon garlic powder, 2 teaspoons chili flakes, 1 teaspoon chili powder, bring to boil then simmer 25 minutes.
Third layer – noocho cheese sauce / dip. Recipe follows.
Fourth through seventh layers – layer the lettuce and scallions, then tomato, then avocado, then olives.


This noocho cheese has gained notoriety as well – it is a favorite in our house and many others. A perfect blend of spicy heat, a subtle buttery sweet from cashews, and the cheesy nutritional yeast – my cravings for this border on obsessive.

noocho cheese sauce

vegan, gluten free, dairy free
1 cup raw cashews, soaked
juice of 1 lemon
2 tablespoons Tabasco sauce (we used less as we are wusses when it comes to heat)
1/3 to 1/2 cup water
1 garlic clove, finely minced
1/3 cup nutritional yeast
1/2 teaspoon paprika
1/4 teaspoon chili powder
1/4 teaspoon onion powder
Begin with soaked cashews – process alone to an almost creamy consistency. Add lemon juice, Tabasco and a couple tablespoons of the water – continue processing until smooth. While processing, add garlic, nutritional yeast, paprika, chili and onion powders, stopping to scrape sides. Add water until desired consistency is reached – more water for sauce, less for dip.


It was only a matter of time before I blogged about a recipe from a vegan mofo post as I have been
bookmarking so many new recipes,so many great ideas!

These are delicious, and I love the idea of quinoa in tacos so much more nutritious than my previous tacos. I loved the cashew cheese too. Really need to make cashew cheese more often.

Here is the recipe from xgfx blog, she also has her own blog here.

 Seven layer tacos Ok so technically six, since I omitted the olives.


The Layers:
  1. jalapeno beans
  2. salsa spiced quinoa
  3. noocho cheese sauce
  4. chopped lettuce and scallions
  5. chopped tomatoes
  6. cubed avocado
  7. jalapeno soaked olives
Layer in hard corn taco shells, or in a serving dish as a seven layer dip. I have served these in small bowls as individual dips as well. No measurements for this – make as little or as much as you want, with layers as thick or thin as you want.
Base layer – canned pinto beans (drained) and chopped jalapeno:  2 cans beans and 2 seeded jalapenos, processed in food processor to a blend of chunky/creamy. I also fried this for a few minutes so it was warm and used chilli flakes.
Second layer – salsa spiced quinoa – quinoa cooked with dried and powdered “salsa flavors” added to the water: I used 1 cup quinoa to 1 1/2 cups vegetable broth, I added 1/4 teaspoon onion powder, 1/2 teaspoon garlic powder, 2 teaspoons chili flakes, 1 teaspoon chili powder, bring to boil then simmer 25 minutes.
Third layer – noocho cheese sauce / dip. Recipe follows.
Fourth through seventh layers – layer the lettuce and scallions, then tomato, then avocado, then olives.


This noocho cheese has gained notoriety as well – it is a favorite in our house and many others. A perfect blend of spicy heat, a subtle buttery sweet from cashews, and the cheesy nutritional yeast – my cravings for this border on obsessive.

noocho cheese sauce

vegan, gluten free, dairy free
1 cup raw cashews, soaked
juice of 1 lemon
2 tablespoons Tabasco sauce (we used less as we are wusses when it comes to heat)
1/3 to 1/2 cup water
1 garlic clove, finely minced
1/3 cup nutritional yeast
1/2 teaspoon paprika
1/4 teaspoon chili powder
1/4 teaspoon onion powder
Begin with soaked cashews – process alone to an almost creamy consistency. Add lemon juice, Tabasco and a couple tablespoons of the water – continue processing until smooth. While processing, add garlic, nutritional yeast, paprika, chili and onion powders, stopping to scrape sides. Add water until desired consistency is reached – more water for sauce, less for dip.


reade more... Résuméabuiyad

Crispiest Tofu-Vegan Mofo Day 8

Have you ever thought that you posted about something only to discover it is still sitting in your drafts? Well I have a few times and this post is a perfect example, I started it before we went away and then got all asborbed in our holiday and forgot til now.

Our friend had a small but fancy themed dinner party with each guest to bring a course.  There was so much good food including Cindy and Michael's fancy mini breakfasts. I made the crispiest tofu which is perhaps not that fancy but oh so delicious and super krispy. Kittee is right that the potato starch is the key and it is the crispiest I've ever eaten. These are quite tasty and so addictive. I marinated the tofu using her suggestion of the breast of tofu marinade but I'm not sure it made a great difference when you are dipping into sauce anyway. If you haven't already checked out xgfx site you should, its a wonderful space because it is all gluten free and vegan!

The Crispiest Tofu from the xgfx blog:

Mix the following together into each bowl:
Bowl 1:
½ cup potato starch
dash of salt and freshly ground black pepper
Bowl 2:
1 cup unsweetened soymilk
1 tablespoon lemon juice (or apple cider vinegar)
1/4 cup chopped parsley (or a combo of other fresh herbs)
dash of salt
dash of hot pepper or allepo pepper
Bowl 3:
1 1/4 cups homemade breadcrumbs (leave your favorite gluten-free bread out on the counter for a day or so, then pulse in a food processor until crumbly).
1/3 cup potato starch
dash of salt and freshly ground black pepper
3/4 teaspoon onion powder
3/4 teaspoon ancho chili powder
Additional ingredients:
1 big block of extra-firm tofu, cut into whatever shapes you want to eat and marinated overnight, or as long as possible.
parchment lined baking sheet, greased with 3 tablespoons of nuetral oil (like canola).
salt and pepper
Preheat oven to 425F.

Dredge a few pieces of tofu with the starch mixture in bowl one. Make sure each piece is completed coated with a thin layer of starch, then tap off any extra and move down to bowl two.
Submerge each tofu into bowl two and allow any excess liquid to drip off. Move ‘em down to bowl three. Pat each piece of tofu in the seasoned breadcrumbs, to completely coat on all sides. Transfer each breaded tofu to the oiled baking sheet.
Repeat the above steps until you’ve breaded everything within reach.
Season the tofu with a little salt and freshly ground black pepper.
Bake for about 5 minutes, then carefully flip each piece to allow the other side to absorb some of the oil from the baking sheet. Bake the tofu until the bottoms are brown and crunchy, about 10 minutes, then flip to brown the second side. Keep an eye on these so they don’t burn, you’re going for a deep golden brown.

Toby attempted to make a red wine reduction but it failed, so I ended up making a :

Simple remoulade:
1 cup vegan mayo
2 tablespoons of tomato sauce
1 tablespoon of lemon  juice

Combine together, voila!
Have you ever thought that you posted about something only to discover it is still sitting in your drafts? Well I have a few times and this post is a perfect example, I started it before we went away and then got all asborbed in our holiday and forgot til now.

Our friend had a small but fancy themed dinner party with each guest to bring a course.  There was so much good food including Cindy and Michael's fancy mini breakfasts. I made the crispiest tofu which is perhaps not that fancy but oh so delicious and super krispy. Kittee is right that the potato starch is the key and it is the crispiest I've ever eaten. These are quite tasty and so addictive. I marinated the tofu using her suggestion of the breast of tofu marinade but I'm not sure it made a great difference when you are dipping into sauce anyway. If you haven't already checked out xgfx site you should, its a wonderful space because it is all gluten free and vegan!

The Crispiest Tofu from the xgfx blog:

Mix the following together into each bowl:
Bowl 1:
½ cup potato starch
dash of salt and freshly ground black pepper
Bowl 2:
1 cup unsweetened soymilk
1 tablespoon lemon juice (or apple cider vinegar)
1/4 cup chopped parsley (or a combo of other fresh herbs)
dash of salt
dash of hot pepper or allepo pepper
Bowl 3:
1 1/4 cups homemade breadcrumbs (leave your favorite gluten-free bread out on the counter for a day or so, then pulse in a food processor until crumbly).
1/3 cup potato starch
dash of salt and freshly ground black pepper
3/4 teaspoon onion powder
3/4 teaspoon ancho chili powder
Additional ingredients:
1 big block of extra-firm tofu, cut into whatever shapes you want to eat and marinated overnight, or as long as possible.
parchment lined baking sheet, greased with 3 tablespoons of nuetral oil (like canola).
salt and pepper
Preheat oven to 425F.

Dredge a few pieces of tofu with the starch mixture in bowl one. Make sure each piece is completed coated with a thin layer of starch, then tap off any extra and move down to bowl two.
Submerge each tofu into bowl two and allow any excess liquid to drip off. Move ‘em down to bowl three. Pat each piece of tofu in the seasoned breadcrumbs, to completely coat on all sides. Transfer each breaded tofu to the oiled baking sheet.
Repeat the above steps until you’ve breaded everything within reach.
Season the tofu with a little salt and freshly ground black pepper.
Bake for about 5 minutes, then carefully flip each piece to allow the other side to absorb some of the oil from the baking sheet. Bake the tofu until the bottoms are brown and crunchy, about 10 minutes, then flip to brown the second side. Keep an eye on these so they don’t burn, you’re going for a deep golden brown.

Toby attempted to make a red wine reduction but it failed, so I ended up making a :

Simple remoulade:
1 cup vegan mayo
2 tablespoons of tomato sauce
1 tablespoon of lemon  juice

Combine together, voila!
reade more... Résuméabuiyad

Tempeh Bacon Experiment-That Recipe Looks Familar

We went over our download limit this week so have not been able to blog about last weeks potluck til now. I'm not too sad about it though because I need to reserve my efforts for vegan mofo, where we (mostly I) will try to blog every day. In reality I will try to stick to 5 posts a week but will see how I go.  Anyway, back to the potluck and the that recipe seems familar blog event.  Both the event and the potluck was to celebrate  Planet VegMel's 2nd birthday.  Planet VegMel is a wonderful site where you can view all the Melbourne veg blogs in one spot. You can read about the first round of posts for the blog event here. There was also a cute zine created at the last minute.

The potluck was great, there was so much amazing food which resulted in me feeling super full and exhausted. You can read about some of the dishes online including Steph's caramel slice, Mel's tofu quiches and apricot delights, Emily's eggplant salad, Michael's enchiladas, Vicki's peanut butter balls, Johannas cake pops, Cindy's cookie sandwiches, Carla's mock crab cakes, Dannis' muffins and bread, Emily's gado gado and turkish truffles. There was more dishes too and thankfully most of the dishes were gluten free so I didn't have to miss out on much. Thanks everyone, it really means a lot! It was great to meet a few new people and to make friends with Johannas cute daughter Sylvia.

Toby wasn't feeling well and so wasn't planning on going til the last minute so he needed some quick to make. He decided on the tempeh not bacon from wheres the beef:

Tempeh, not bacon
(based on recipe at Get Sconed!)

300g tempeh
4 tablespoons soy sauce
~1 teaspoon garlic powder
1 tablespoon golden syrup
1/4 teaspoon liquid smoke
2 teaspoons tomato paste
vegetable oil, for frying

Slice the tempeh into the thinnest sheets you can.

Whisk the rest of the ingredients (except the oil) together in a bowl.

Spread some of the marinade on the base of a shallow tray, lay out the tempeh, and spread over more marinade. Let the tempeh soak up the yum for at least a couple of hours; pop it in the fridge and it'll last for days.

When the tempeh's ready, pour a little oil in a fry pan a heat it to medium/high. Fry the tempeh strips until they darken and crisp up a little.


He put it on top of some tofu 'egg'  and hollandaise sauce from vegan brunch. The tofu egg wasn't particuarly eggy because we didn't have black salt but I enjoyed the hollaindaise sauce:

 Despite being not the biggest fan of tempeh, I loved it so I decided to also try the tempeh bacon from easy as vegan pie:

Tempeh Bacon originally from Veg News TV
1 packet of tempeh, pat dry and slice thinly
1/4 cup of soy sauce/tamari
1/4 cup of maple syrup
1 tbsp of liquid smoke

1. Steam the tempeh slices for 8-10 minutes in vegie steamer. The tempeh will go a whiteish colour.

2. Mix up the marinade and soak the tempeh strips for an hour or over night if possible.

3. Line up the tempeh strips on a wire rack and drain the marinade off then line the little soldiers up on a baking sheet and grill them at 200 degrees (or high). I just fried mine for about 10 minutes on each side.

I served it for over brown rice, with roasted pumpkin, greens and the wonderful chickpea gravy from appetite for reduction which all made one super yummy and almost healthy dinner.


The main difference with this recipe was the steaming, which does result in a slightly superior flavour and texture. We will certainly stick to steaming from now on.

I do have one more post for the recipe looks familar blog event, but might save it for vegan mofo. See you in a weeks time!
We went over our download limit this week so have not been able to blog about last weeks potluck til now. I'm not too sad about it though because I need to reserve my efforts for vegan mofo, where we (mostly I) will try to blog every day. In reality I will try to stick to 5 posts a week but will see how I go.  Anyway, back to the potluck and the that recipe seems familar blog event.  Both the event and the potluck was to celebrate  Planet VegMel's 2nd birthday.  Planet VegMel is a wonderful site where you can view all the Melbourne veg blogs in one spot. You can read about the first round of posts for the blog event here. There was also a cute zine created at the last minute.

The potluck was great, there was so much amazing food which resulted in me feeling super full and exhausted. You can read about some of the dishes online including Steph's caramel slice, Mel's tofu quiches and apricot delights, Emily's eggplant salad, Michael's enchiladas, Vicki's peanut butter balls, Johannas cake pops, Cindy's cookie sandwiches, Carla's mock crab cakes, Dannis' muffins and bread, Emily's gado gado and turkish truffles. There was more dishes too and thankfully most of the dishes were gluten free so I didn't have to miss out on much. Thanks everyone, it really means a lot! It was great to meet a few new people and to make friends with Johannas cute daughter Sylvia.

Toby wasn't feeling well and so wasn't planning on going til the last minute so he needed some quick to make. He decided on the tempeh not bacon from wheres the beef:

Tempeh, not bacon
(based on recipe at Get Sconed!)

300g tempeh
4 tablespoons soy sauce
~1 teaspoon garlic powder
1 tablespoon golden syrup
1/4 teaspoon liquid smoke
2 teaspoons tomato paste
vegetable oil, for frying

Slice the tempeh into the thinnest sheets you can.

Whisk the rest of the ingredients (except the oil) together in a bowl.

Spread some of the marinade on the base of a shallow tray, lay out the tempeh, and spread over more marinade. Let the tempeh soak up the yum for at least a couple of hours; pop it in the fridge and it'll last for days.

When the tempeh's ready, pour a little oil in a fry pan a heat it to medium/high. Fry the tempeh strips until they darken and crisp up a little.


He put it on top of some tofu 'egg'  and hollandaise sauce from vegan brunch. The tofu egg wasn't particuarly eggy because we didn't have black salt but I enjoyed the hollaindaise sauce:

 Despite being not the biggest fan of tempeh, I loved it so I decided to also try the tempeh bacon from easy as vegan pie:

Tempeh Bacon originally from Veg News TV
1 packet of tempeh, pat dry and slice thinly
1/4 cup of soy sauce/tamari
1/4 cup of maple syrup
1 tbsp of liquid smoke

1. Steam the tempeh slices for 8-10 minutes in vegie steamer. The tempeh will go a whiteish colour.

2. Mix up the marinade and soak the tempeh strips for an hour or over night if possible.

3. Line up the tempeh strips on a wire rack and drain the marinade off then line the little soldiers up on a baking sheet and grill them at 200 degrees (or high). I just fried mine for about 10 minutes on each side.

I served it for over brown rice, with roasted pumpkin, greens and the wonderful chickpea gravy from appetite for reduction which all made one super yummy and almost healthy dinner.


The main difference with this recipe was the steaming, which does result in a slightly superior flavour and texture. We will certainly stick to steaming from now on.

I do have one more post for the recipe looks familar blog event, but might save it for vegan mofo. See you in a weeks time!
reade more... Résuméabuiyad

Zucchini Quinoa Lasagna-That Recipe Looks Familar

My last post for that recipe looks familiar involves lasagna, but not the regular kind. This uses zucchini instead of pasta and has a quinoa filling. Although the recipe is originally from another overseas blog, I only come across it when Vicki posted it for vegan mofo last year. I doubled this to make enough for dinner and leftovers for tomorrow and added more cheezly on top.

Zucchini Quinoa Lasagna from Peas and Thank You  as seen on Vicki Vegan
Serves 4-6

  • 2 large zucchini, cut into 12 thin, 1/4 in. thick slices
  • salt
  • 1 c. quinoa, rinsed
  • 2 c. vegetable broth
  • 1/2 c. tomato sauce
  • 1/4 c. minced onion
  • 1 t. dried oregano
  • 1/4 c. fresh basil, chopped
  • 1/4 c. fresh parsley, chopped
  • 2 T. organic or non-dairy cream cheese (optional) tofutti sour cream
  • salt and pepper to taste
  • 1 jar  marinara sauce
  • 1/2 c.  non-dairy cheese

Preheat oven to 400.
To prepare zucchini, cut a strip off of one side to make a flat base.

Then, thinly slice zucchini into “noodles.”  You’ll want 12 noodles in total.

Place noodles in a colander and sprinkle with salt, layering between paper towels.

Let this sit and absorb moisture while preparing the quinoa.

Combine quinoa, vegetable broth, tomato sauce, onion and oregano in a large saucepan and bring to a boil.

Cover and lower heat, simmering for 20 minutes.
When quinoa has absorbed all the liquid, fold in cream cheese and herbs.

Add salt and pepper to taste, and try not to eat the whole pot.

Believe it or not, it gets better.
Pour enough of marinara in the bottom of an 8×8 baking dish to cover the bottom.  Using a clean dry towel, blot remaining moisture and salt from zucchini and layer 4 noodles across the sauce.

Put a layer of quinoa across the zucchini,

and cover with another 1/3 c. of marinara sauce.
Repeat with another layer of quinoa, sauce and zucchini.
Top the final layer of zucchini with remaining sauce and 1/2 c. of cheese, if using.

Bake lasagna for 30 minutes, until heated through and zucchini is tender.


Toby and I both enjoyed this and found it to be a great way to use up quinoa but probably prefer my mothers tofu lasagna if we had to choose, but then you always prefer you mothers cooking, right? Overall though the quinoa worked really well as a filling, it held together well and was quite feeling, I wonder how it would go if I combined the two recipes.


My last post for that recipe looks familiar involves lasagna, but not the regular kind. This uses zucchini instead of pasta and has a quinoa filling. Although the recipe is originally from another overseas blog, I only come across it when Vicki posted it for vegan mofo last year. I doubled this to make enough for dinner and leftovers for tomorrow and added more cheezly on top.

Zucchini Quinoa Lasagna from Peas and Thank You  as seen on Vicki Vegan
Serves 4-6

  • 2 large zucchini, cut into 12 thin, 1/4 in. thick slices
  • salt
  • 1 c. quinoa, rinsed
  • 2 c. vegetable broth
  • 1/2 c. tomato sauce
  • 1/4 c. minced onion
  • 1 t. dried oregano
  • 1/4 c. fresh basil, chopped
  • 1/4 c. fresh parsley, chopped
  • 2 T. organic or non-dairy cream cheese (optional) tofutti sour cream
  • salt and pepper to taste
  • 1 jar  marinara sauce
  • 1/2 c.  non-dairy cheese

Preheat oven to 400.
To prepare zucchini, cut a strip off of one side to make a flat base.

Then, thinly slice zucchini into “noodles.”  You’ll want 12 noodles in total.

Place noodles in a colander and sprinkle with salt, layering between paper towels.

Let this sit and absorb moisture while preparing the quinoa.

Combine quinoa, vegetable broth, tomato sauce, onion and oregano in a large saucepan and bring to a boil.

Cover and lower heat, simmering for 20 minutes.
When quinoa has absorbed all the liquid, fold in cream cheese and herbs.

Add salt and pepper to taste, and try not to eat the whole pot.

Believe it or not, it gets better.
Pour enough of marinara in the bottom of an 8×8 baking dish to cover the bottom.  Using a clean dry towel, blot remaining moisture and salt from zucchini and layer 4 noodles across the sauce.

Put a layer of quinoa across the zucchini,

and cover with another 1/3 c. of marinara sauce.
Repeat with another layer of quinoa, sauce and zucchini.
Top the final layer of zucchini with remaining sauce and 1/2 c. of cheese, if using.

Bake lasagna for 30 minutes, until heated through and zucchini is tender.


Toby and I both enjoyed this and found it to be a great way to use up quinoa but probably prefer my mothers tofu lasagna if we had to choose, but then you always prefer you mothers cooking, right? Overall though the quinoa worked really well as a filling, it held together well and was quite feeling, I wonder how it would go if I combined the two recipes.


reade more... Résuméabuiyad

Mee Goreng- That Recipe Seems Familar

This is my second post for that recipe seems familar blog event. This dish was a perfect weeknight dinner and it does features noodles! However, I did make lots of changes to make it gluten free, to add protein and to use what we had in the food co-op. Hope it still qualifies!

Mee Goreng
I kind of combined elements from vegan about town's two posts on mee goreng, both here and here. I've noted the changes below.

ingredients
500g Hokkien noodles  1 packet of 454 grams (16oz) rice noodles (Kong Moon rice sticks)
2 clove garlic (crushed or minced) (we increased this)
3 tomatoes (cut into small wedges) (we increased this)
2 bulbs bok choy (leaves cut in half or thirds, stalks sliced length-ways) 1 bunch of silverbeet
half a cup of bean shoots (tails off)
1 carrot (julienned)
1 potato (steamed and julienned) 2 packets of fried tofu
1 or 2 red chillis (sliced into rounds) 3 tablespoons of dried chillies


Sauce: ( I think I ended up timing this recipe below by about 6)
4 or five shakes of vegetarian oyster sauce tiny bit of hoisin sauce
5 shakes dark soy sauce (used regular gf soy sauce)
a little bit of kejap manis
1 tspish tomato sauce
some chilli sauce
1 tsp sugar

method
Combine together the hoisin, soy sauce, sugar, kejap manis, and tomato sauce, and add a few shakes of chilli sauce.

Soak the noodles in hot water for until soft with rice noodles this took about 15-20 minutes (with hokkien its is much much quicker) then drain and set aside

Heat up the wok, and coat the insides with a thin layer of oil. Throw in the garlic and chilli, and fry for a minute or two. Add the tofu and fry for a few minutes then remove tofu and set aside. Add a teaspoon or three of water to the wok,  throw in the tomatoes and silverbeet and replace the lid. There should not be a lot of water, only enough to keep it steaming!

After a minute or three, throw in the noodles, tofu and the sauce. Put the lid on for a minute and leave to make lots of noises. When you next take off the lid, and try to toss the noodles, they should have started sticking to the wok, because all the liquid has dried up. This is good, but don't get too complacent! Alternate between tearing the noodles up off the wok, and leaving to burn, for about another two or three minutes.

Serve hot.

Excuse the ugly photo, I was starving and just wanted to eat it immediately:


We eat a lot of noodles in this house but this was the first time that we fried them with the lid on. I loved this but I really think that rice noodles doesn't work as well so I recommend going with the hokkien if you can eat wheat instead. I'm not sure which variation in this recipe meant that we needed a lot more sauce, so taste accordingly.
This is my second post for that recipe seems familar blog event. This dish was a perfect weeknight dinner and it does features noodles! However, I did make lots of changes to make it gluten free, to add protein and to use what we had in the food co-op. Hope it still qualifies!

Mee Goreng
I kind of combined elements from vegan about town's two posts on mee goreng, both here and here. I've noted the changes below.

ingredients
500g Hokkien noodles  1 packet of 454 grams (16oz) rice noodles (Kong Moon rice sticks)
2 clove garlic (crushed or minced) (we increased this)
3 tomatoes (cut into small wedges) (we increased this)
2 bulbs bok choy (leaves cut in half or thirds, stalks sliced length-ways) 1 bunch of silverbeet
half a cup of bean shoots (tails off)
1 carrot (julienned)
1 potato (steamed and julienned) 2 packets of fried tofu
1 or 2 red chillis (sliced into rounds) 3 tablespoons of dried chillies


Sauce: ( I think I ended up timing this recipe below by about 6)
4 or five shakes of vegetarian oyster sauce tiny bit of hoisin sauce
5 shakes dark soy sauce (used regular gf soy sauce)
a little bit of kejap manis
1 tspish tomato sauce
some chilli sauce
1 tsp sugar

method
Combine together the hoisin, soy sauce, sugar, kejap manis, and tomato sauce, and add a few shakes of chilli sauce.

Soak the noodles in hot water for until soft with rice noodles this took about 15-20 minutes (with hokkien its is much much quicker) then drain and set aside

Heat up the wok, and coat the insides with a thin layer of oil. Throw in the garlic and chilli, and fry for a minute or two. Add the tofu and fry for a few minutes then remove tofu and set aside. Add a teaspoon or three of water to the wok,  throw in the tomatoes and silverbeet and replace the lid. There should not be a lot of water, only enough to keep it steaming!

After a minute or three, throw in the noodles, tofu and the sauce. Put the lid on for a minute and leave to make lots of noises. When you next take off the lid, and try to toss the noodles, they should have started sticking to the wok, because all the liquid has dried up. This is good, but don't get too complacent! Alternate between tearing the noodles up off the wok, and leaving to burn, for about another two or three minutes.

Serve hot.

Excuse the ugly photo, I was starving and just wanted to eat it immediately:


We eat a lot of noodles in this house but this was the first time that we fried them with the lid on. I loved this but I really think that rice noodles doesn't work as well so I recommend going with the hokkien if you can eat wheat instead. I'm not sure which variation in this recipe meant that we needed a lot more sauce, so taste accordingly.
reade more... Résuméabuiyad

Toby's Singapore Noodles

Singapore style noodles are not from Singapore but are actually from Hong Kong. Toby has been playing around with this recipe for a while and this is our favourite version so far and is my latest savoury obsession. I would have it every night if I could but Toby is being the voice of reason and reminded me that with all of the frying it is isn't the healthiest. I love that it's mild enough that we can eat it but spicy enough to have just a little bit of kick. I always add more soy sauce to mine because I love salty food so feel free to play around with it to suit your tastes. We use whatever veggies we have in the food co- op box and generally use greens but didn't have any today.

1.5 tablespoon of sesame seeds, toasted
1 packet of 454 grams (16oz) rice noodles (we use Kong Moon rice sticks)
2 packets of 300 grams fried firm tofu, sliced into strips (we use yensons)
2 medium carrots, peeled and sliced 
1  medium capscisum, sliced
1 onion, sliced
2-3 tablespoons of curry powder
a pinch to 1/2 teaspoon of dried chilli flakes (start with less)
1/4 cup of vegetable stock
2 tablespoons of vegetable oil
a splash of sesame oil
a splash of G/F soy sauce
tumeric powder (optional for colour)
salt and white pepper to taste
  1. Soak rice noodles in enough hot water to cover until they are soft, roughly 20 minutes. 

  2. Marinate tofu, carrots and capsicum in splash of sesame oil and soy sauce and with the chilli flakes for at least 10 minutes.

  3. Toast sesame seeds in dry pan and put to side.

  4. Fry onion until soft in vegetable oil, add curry powder and fry until it is combined and fragrant.

  5. Add tofu and vegies to fry pan and fry until vegetables are soft.

  6. Drain rice noodles, rinse with cold water and add to pan.

  7. Mix well and add stock.Stir and fry until stock is absorbed.

  8. Add salt (or soy sauce) and white pepper to taste. Serve with sesame seeds and sesame oil.

Ideally you should cook everything on high in a wok, if you have a small frypan or wok you might want to half this recipe. We have a gigantic frypan but look at how full it is without the noodles:


Serves 4-6. Toby is a big eater so it only serves 4 in our household but could serve 6 regular eaters. We always make enough for 4 so we can have leftovers for lunch the following day.

Chef suggestion: enjoy with pu-erh tea or cola

Enjoy!


Singapore style noodles are not from Singapore but are actually from Hong Kong. Toby has been playing around with this recipe for a while and this is our favourite version so far and is my latest savoury obsession. I would have it every night if I could but Toby is being the voice of reason and reminded me that with all of the frying it is isn't the healthiest. I love that it's mild enough that we can eat it but spicy enough to have just a little bit of kick. I always add more soy sauce to mine because I love salty food so feel free to play around with it to suit your tastes. We use whatever veggies we have in the food co- op box and generally use greens but didn't have any today.

1.5 tablespoon of sesame seeds, toasted
1 packet of 454 grams (16oz) rice noodles (we use Kong Moon rice sticks)
2 packets of 300 grams fried firm tofu, sliced into strips (we use yensons)
2 medium carrots, peeled and sliced 
1  medium capscisum, sliced
1 onion, sliced
2-3 tablespoons of curry powder
a pinch to 1/2 teaspoon of dried chilli flakes (start with less)
1/4 cup of vegetable stock
2 tablespoons of vegetable oil
a splash of sesame oil
a splash of G/F soy sauce
tumeric powder (optional for colour)
salt and white pepper to taste
  1. Soak rice noodles in enough hot water to cover until they are soft, roughly 20 minutes. 

  2. Marinate tofu, carrots and capsicum in splash of sesame oil and soy sauce and with the chilli flakes for at least 10 minutes.

  3. Toast sesame seeds in dry pan and put to side.

  4. Fry onion until soft in vegetable oil, add curry powder and fry until it is combined and fragrant.

  5. Add tofu and vegies to fry pan and fry until vegetables are soft.

  6. Drain rice noodles, rinse with cold water and add to pan.

  7. Mix well and add stock.Stir and fry until stock is absorbed.

  8. Add salt (or soy sauce) and white pepper to taste. Serve with sesame seeds and sesame oil.

Ideally you should cook everything on high in a wok, if you have a small frypan or wok you might want to half this recipe. We have a gigantic frypan but look at how full it is without the noodles:


Serves 4-6. Toby is a big eater so it only serves 4 in our household but could serve 6 regular eaters. We always make enough for 4 so we can have leftovers for lunch the following day.

Chef suggestion: enjoy with pu-erh tea or cola

Enjoy!


reade more... Résuméabuiyad

Malai Kofta


I made this the other day and it is my new favourite Indian dish to make at home. The balls are great, the sauce is great and together it is kind of magnificent. The following day I had it at work and had multiple people ask what the yummy smell was. I substituted cumin for cumin seeds and left out the cilantro but it was still damn tasty. I was particularly amazed with the tangy sauce, which I think is quite similar to other Indian tangy sauces. The only downside was Toby's comment that there is no protein so I mixed some beans into the sauce (after the photo). We will certainly be making this again!

Malai Kofta by happyveganface:

kofta balls:
3 small russet potatoes, boiled until cooked through
½ yellow onion, diced
3 cloves o’ garlic, crushed & minced
¼“ ginger, peeled & chopped
3 green onions, very finely chopped (white & green parts!)
big ‘ol handful of fresh cilantro, chopped
2 slices ‘o gluten-free bread
¼ cup raw cashew pieces
2 tsp safflower oil
½ tsp black pepper
½ tsp cumin seeds
½ tsp paprika
½ tsp sea salt
¼ tsp garam masala
pinch of cayenne pepper

malai kofta gravy:
2 large tomatoes, finely diced
6 mushrooms, finely diced
3 big cloves o’ garlic, crushed & minced
½ yellow onion, finely diced
½ bell pepper, finely diced
½ cup veggie broth
¼ cup coconut milk (or any non-diary milk)
2 tbsp chickpea flour
2 tsp safflower oil
1 tsp toasted ground coriander
½ tsp cumin
½ tsp black pepper
¼ tsp turmeric
¼ tsp sea salt
juice from ½ a lime
handful of fresh cilantro, chopped
handful of fresh parsley, chopped
Start with the potato balls: in one skillet toast up those cumin seeds & cashews on medium heat. set aside. place the 2 tsp of oil in the other skillet and heat to medium and sauté the onions and ginger until the onions become clear. add the garlic to the onions and sauté for another minute. add the remaining spices for the  kofta balls and let it cook for another minute. remove the spiced onion mix from the stove & transfer to the food processor. add to the food processor those toasted cashew pieces & cumin seeds, slices of gluten-free bread, and cilantro. whiz it up until it’s pretty well combined then transfer the whole mess o’ yum to the large mixing bowl (which you could use to smash up those potatoes) & add the smashed potatoes & green onions. combine well & adjust seasonings to taste. form a bunch ‘o walnut sized balls and place them on the baking sheet that’s been spritzed with a little cooking spray. bake the kofta balls on 350 (no need to preheat) for 20 minutes. turn them over & bake another 10. while your balls are baking get your gravy on!

In the medium pot, on medium heat, sauté the onions, bell pepper, mushrooms & garlic until the onions become soft (don’t let them brown). add in the spices & sauté for another minute. toss in the chopped tomatoes & veggie broth. bring everything to a boil, cover, and reduce the heat – simmer for 10 minutes. uncover, add the coconut milk, and whisk in the chickpea flour. toss in the cilantro, parsley and lime juice, adjust seasonings to taste, and set aside.

To serve: ladle gravy over kofta balls & enjoy! 

I made this the other day and it is my new favourite Indian dish to make at home. The balls are great, the sauce is great and together it is kind of magnificent. The following day I had it at work and had multiple people ask what the yummy smell was. I substituted cumin for cumin seeds and left out the cilantro but it was still damn tasty. I was particularly amazed with the tangy sauce, which I think is quite similar to other Indian tangy sauces. The only downside was Toby's comment that there is no protein so I mixed some beans into the sauce (after the photo). We will certainly be making this again!

Malai Kofta by happyveganface:

kofta balls:
3 small russet potatoes, boiled until cooked through
½ yellow onion, diced
3 cloves o’ garlic, crushed & minced
¼“ ginger, peeled & chopped
3 green onions, very finely chopped (white & green parts!)
big ‘ol handful of fresh cilantro, chopped
2 slices ‘o gluten-free bread
¼ cup raw cashew pieces
2 tsp safflower oil
½ tsp black pepper
½ tsp cumin seeds
½ tsp paprika
½ tsp sea salt
¼ tsp garam masala
pinch of cayenne pepper

malai kofta gravy:
2 large tomatoes, finely diced
6 mushrooms, finely diced
3 big cloves o’ garlic, crushed & minced
½ yellow onion, finely diced
½ bell pepper, finely diced
½ cup veggie broth
¼ cup coconut milk (or any non-diary milk)
2 tbsp chickpea flour
2 tsp safflower oil
1 tsp toasted ground coriander
½ tsp cumin
½ tsp black pepper
¼ tsp turmeric
¼ tsp sea salt
juice from ½ a lime
handful of fresh cilantro, chopped
handful of fresh parsley, chopped
Start with the potato balls: in one skillet toast up those cumin seeds & cashews on medium heat. set aside. place the 2 tsp of oil in the other skillet and heat to medium and sauté the onions and ginger until the onions become clear. add the garlic to the onions and sauté for another minute. add the remaining spices for the  kofta balls and let it cook for another minute. remove the spiced onion mix from the stove & transfer to the food processor. add to the food processor those toasted cashew pieces & cumin seeds, slices of gluten-free bread, and cilantro. whiz it up until it’s pretty well combined then transfer the whole mess o’ yum to the large mixing bowl (which you could use to smash up those potatoes) & add the smashed potatoes & green onions. combine well & adjust seasonings to taste. form a bunch ‘o walnut sized balls and place them on the baking sheet that’s been spritzed with a little cooking spray. bake the kofta balls on 350 (no need to preheat) for 20 minutes. turn them over & bake another 10. while your balls are baking get your gravy on!

In the medium pot, on medium heat, sauté the onions, bell pepper, mushrooms & garlic until the onions become soft (don’t let them brown). add in the spices & sauté for another minute. toss in the chopped tomatoes & veggie broth. bring everything to a boil, cover, and reduce the heat – simmer for 10 minutes. uncover, add the coconut milk, and whisk in the chickpea flour. toss in the cilantro, parsley and lime juice, adjust seasonings to taste, and set aside.

To serve: ladle gravy over kofta balls & enjoy! 
reade more... Résuméabuiyad

Vegemite Tofu

I always cook Matthew's Delicious Tofu for dinner. It is fast, full of protein (3x500g tofu!!) and yummy.

The other day, K and I were talking about serving pan fried tofu with the vegemite gravy we made before.  And now we have a new easy weeknight dish.

Instead of vegemite or NON-gluten-free Marmite, we used Freedom Foods' Vege Spread.


Vegemite Tofu
(serves 6)

What you need:

3 packs of 500g firm tofu, sliced or diced (We love Yenson's so does Cindy & Michael)
Whatever amount (within reason) of vegies, chopped 
Handful of sesame seeds
1 TBSP of sesame oil or raw coconut butter
6 gloves of garlic, minced (or you can use the whole thing)
2-4 TBSP Freedom Foods' Vege Spread
1 to 3 TPSP of corn flour or any gluten-free flour
1 1/2 cup of water
Dash of tamari or gluten-free soy sauce (We use Chang's)

What you need to do:

- Brown sesame seed on fry pan, set aside.  

- Heat oil and pan fry tofu on non-stick fry pan or wok, add dash of tamari on top of tofu just before you flip it.  Set aside in a big metal mixing bowl or tray.

- Heat oil on non-stick fry pan or wok.  Saute minced garlic for a moment and add vegies.  Stir fry for a moment.

- Add Vege Spread and water.  Stir fry until it's mixed in with vegie.

- Slowly add gluten-free flour to the pan.  Keep stirring until it is thick enough.


- Add tofu back to the pan and sprinkle sesame seeds on top.


You can serve it with brown rice, noodles or even mashed potatoes!
I always cook Matthew's Delicious Tofu for dinner. It is fast, full of protein (3x500g tofu!!) and yummy.

The other day, K and I were talking about serving pan fried tofu with the vegemite gravy we made before.  And now we have a new easy weeknight dish.

Instead of vegemite or NON-gluten-free Marmite, we used Freedom Foods' Vege Spread.


Vegemite Tofu
(serves 6)

What you need:

3 packs of 500g firm tofu, sliced or diced (We love Yenson's so does Cindy & Michael)
Whatever amount (within reason) of vegies, chopped 
Handful of sesame seeds
1 TBSP of sesame oil or raw coconut butter
6 gloves of garlic, minced (or you can use the whole thing)
2-4 TBSP Freedom Foods' Vege Spread
1 to 3 TPSP of corn flour or any gluten-free flour
1 1/2 cup of water
Dash of tamari or gluten-free soy sauce (We use Chang's)

What you need to do:

- Brown sesame seed on fry pan, set aside.  

- Heat oil and pan fry tofu on non-stick fry pan or wok, add dash of tamari on top of tofu just before you flip it.  Set aside in a big metal mixing bowl or tray.

- Heat oil on non-stick fry pan or wok.  Saute minced garlic for a moment and add vegies.  Stir fry for a moment.

- Add Vege Spread and water.  Stir fry until it's mixed in with vegie.

- Slowly add gluten-free flour to the pan.  Keep stirring until it is thick enough.


- Add tofu back to the pan and sprinkle sesame seeds on top.


You can serve it with brown rice, noodles or even mashed potatoes!
reade more... Résuméabuiyad

Ottolenghi's Black Pepper Tofu

Ottolenghi seems to be all the rage at the moment. I think I missed the memo about how/why he become popular but this dish looks pretty so I put it as my request for Toby to make it and he did. He only used about half the black pepper and it was still too spicy. I wish we read Carla's review before because she discussed the same issue, so I suggest starting with 1 teaspoon of pepper and then adding more. He also didn't put in cornstarch or deep fry, instead choosing to do our regular stir fried tofu method and added some green beans. It was delicious and I think we will make it again but with less pepper.


Ottolenghi's Black Pepper Tofu from The Guardian 
 
800gm firm tofu
Oil for frying
12 small shallots, sliced thickly
8 fresh red chillis
12 garlic cloves
3 tbsp fresh ginger
3 tbsp sweet soy
3 tbsp light soy
4 tbsp dark soy
2 tbsp caster sugar
5 tsp crushed black pepper (Caution-see note above)
16 spring onions, thinly sliced

Cut the tofu into 3cm x 2cm blocks and toss them in cornflour, shaking off the excess. Pour in enough oil to come 0.5cm up the sides of a large frying pan, and bring up to frying heat. Fry the tofu in batches in the oil, turning the pieces as you go. Once they are golden all around, and have a thin crust, transfer to a paper towel.
Remove the oil and any sediment from the pan and throw in the butter. Once it has melted, add the shallots, chillies, garlic and ginger, and sauté for about 15 minutes on low-medium heat, stirring occasionally, until the contents of the pan are shiny and totally soft. While you wait, crush the peppercorns, using a pestle and mortar or a spice grinder. They should be quite coarse.
When the shallots and chillies are soft, add the soy sauces and the sugar, stir, then stir in the crushed pepper. Warm the tofu in the sauce for about a minute, then add the spring onion and stir through. Serve hot with steamed rice.
Ottolenghi seems to be all the rage at the moment. I think I missed the memo about how/why he become popular but this dish looks pretty so I put it as my request for Toby to make it and he did. He only used about half the black pepper and it was still too spicy. I wish we read Carla's review before because she discussed the same issue, so I suggest starting with 1 teaspoon of pepper and then adding more. He also didn't put in cornstarch or deep fry, instead choosing to do our regular stir fried tofu method and added some green beans. It was delicious and I think we will make it again but with less pepper.


Ottolenghi's Black Pepper Tofu from The Guardian 
 
800gm firm tofu
Oil for frying
12 small shallots, sliced thickly
8 fresh red chillis
12 garlic cloves
3 tbsp fresh ginger
3 tbsp sweet soy
3 tbsp light soy
4 tbsp dark soy
2 tbsp caster sugar
5 tsp crushed black pepper (Caution-see note above)
16 spring onions, thinly sliced

Cut the tofu into 3cm x 2cm blocks and toss them in cornflour, shaking off the excess. Pour in enough oil to come 0.5cm up the sides of a large frying pan, and bring up to frying heat. Fry the tofu in batches in the oil, turning the pieces as you go. Once they are golden all around, and have a thin crust, transfer to a paper towel.
Remove the oil and any sediment from the pan and throw in the butter. Once it has melted, add the shallots, chillies, garlic and ginger, and sauté for about 15 minutes on low-medium heat, stirring occasionally, until the contents of the pan are shiny and totally soft. While you wait, crush the peppercorns, using a pestle and mortar or a spice grinder. They should be quite coarse.
When the shallots and chillies are soft, add the soy sauces and the sugar, stir, then stir in the crushed pepper. Warm the tofu in the sauce for about a minute, then add the spring onion and stir through. Serve hot with steamed rice.
reade more... Résuméabuiyad

Peanut Eggplant and Shallot Stew

About a fortnight ago when the weather was cooler here Toby made this stew it's actually called spicy peanut eggplant and shallot stew but we made it mild.


Peanut Eggplant And Shallot Stew from PPK

1 lb. Eggplant, peeled, chopped in 1/2 inch cubes
1 tsp salt
4 oz. Shallots, peeled and sliced very thin
1/4 cup peanut oil
1 medium yellow onion, diced
1 hot chili, seeded and minced (skipped this and used tiny bit of dried chilli flakes)
1” cube of ginger, peeled and minced
1 tsp ground cumin
1/8-1/4 tsp ground cayenne pepper (optional)
1 tsp ground coriander
1/4 tsp ground tumeric
1/3 cup tomato paste
1 16 oz. Can roasted diced tomatoes w/ juice (I used regular diced tomatoes)
5 cups water or light veggie broth
1/2 cup creamy or chunky natural peanut butter
6 oz green beans, trimmed and cut into 2 inch pieces
2 T fresh lemon juice
1/3 cup coarsely chopped cilantro, lightly packed
chopped roasted peanuts and cilantro leaves for garnish (we skipped this too)

Directions
In a large bowl or colander toss eggplant cubes with salt. Allow to sit of 30 minutes to soften, then gently rinse eggplant chunks with cold running water. Drain and set aside.
In a large stock pot heat 2 T peanut oil over medium high heat. Add shallots and fry, occasionally stirring, for about 20 minutes until very soft, browned and slightly caramelized. Scoop shallots out of pot and set aside.
Add 1 T of oil to pot and add eggplant, stirring to coat with oil. Stir and cook eggplant for 12-15 minutes until slightly tender. Remove eggplant from heat and set aside (I toss it in the same bowl with the shallots).
Add remaining 1 T of oil to the pot again, then add ginger and chile and fry for 30 seconds. Add ground cumin, coriander, tumeric and fry for another 30 second then add onion. Stir and fry till onion is just slightly soft and translucent, about 5-6 minutes. Add tomato paste, stir and fry mixture for 1 minute.
Pour diced tomatoes, water or broth, eggplant, string beans and shallots into pot with frying onion/spice mixture. Stir to combined and raise heat to medium high. Bring to a boil for 5 minutes, then reduce heat.
In a separate bowl stir peanut butter to combine any separated oils. Pour a ladleful of hot soup onto peanut butter. Stir peanut butter with soup till creamy and peanut butter is completely emulsified. Scrape peanut butter mixture into rest of simmering soup, stirring to combine.
Simmer soup on medium-low heat, covered, for 35-45 minutes or until eggplant is very tender. Remove from heat and stir in cilantro and lemon juice. Salt to taste after soup has cooled for at least half an hour.


We have issues in the past making eggplant dishes, I'm not sure if we don't salt it long enough or don't cook it long enough but it always ends up bitter and a bit too hard but the eggplant was perfect in this. This dish was easy enough to make and had a beautiful rich flavour we will be making it again in winter.
About a fortnight ago when the weather was cooler here Toby made this stew it's actually called spicy peanut eggplant and shallot stew but we made it mild.


Peanut Eggplant And Shallot Stew from PPK

1 lb. Eggplant, peeled, chopped in 1/2 inch cubes
1 tsp salt
4 oz. Shallots, peeled and sliced very thin
1/4 cup peanut oil
1 medium yellow onion, diced
1 hot chili, seeded and minced (skipped this and used tiny bit of dried chilli flakes)
1” cube of ginger, peeled and minced
1 tsp ground cumin
1/8-1/4 tsp ground cayenne pepper (optional)
1 tsp ground coriander
1/4 tsp ground tumeric
1/3 cup tomato paste
1 16 oz. Can roasted diced tomatoes w/ juice (I used regular diced tomatoes)
5 cups water or light veggie broth
1/2 cup creamy or chunky natural peanut butter
6 oz green beans, trimmed and cut into 2 inch pieces
2 T fresh lemon juice
1/3 cup coarsely chopped cilantro, lightly packed
chopped roasted peanuts and cilantro leaves for garnish (we skipped this too)

Directions
In a large bowl or colander toss eggplant cubes with salt. Allow to sit of 30 minutes to soften, then gently rinse eggplant chunks with cold running water. Drain and set aside.
In a large stock pot heat 2 T peanut oil over medium high heat. Add shallots and fry, occasionally stirring, for about 20 minutes until very soft, browned and slightly caramelized. Scoop shallots out of pot and set aside.
Add 1 T of oil to pot and add eggplant, stirring to coat with oil. Stir and cook eggplant for 12-15 minutes until slightly tender. Remove eggplant from heat and set aside (I toss it in the same bowl with the shallots).
Add remaining 1 T of oil to the pot again, then add ginger and chile and fry for 30 seconds. Add ground cumin, coriander, tumeric and fry for another 30 second then add onion. Stir and fry till onion is just slightly soft and translucent, about 5-6 minutes. Add tomato paste, stir and fry mixture for 1 minute.
Pour diced tomatoes, water or broth, eggplant, string beans and shallots into pot with frying onion/spice mixture. Stir to combined and raise heat to medium high. Bring to a boil for 5 minutes, then reduce heat.
In a separate bowl stir peanut butter to combine any separated oils. Pour a ladleful of hot soup onto peanut butter. Stir peanut butter with soup till creamy and peanut butter is completely emulsified. Scrape peanut butter mixture into rest of simmering soup, stirring to combine.
Simmer soup on medium-low heat, covered, for 35-45 minutes or until eggplant is very tender. Remove from heat and stir in cilantro and lemon juice. Salt to taste after soup has cooled for at least half an hour.


We have issues in the past making eggplant dishes, I'm not sure if we don't salt it long enough or don't cook it long enough but it always ends up bitter and a bit too hard but the eggplant was perfect in this. This dish was easy enough to make and had a beautiful rich flavour we will be making it again in winter.
reade more... Résuméabuiyad

Beetroot Pepperoni and Pizza Base Comparison

As soon as we received beetroot in our food co op box last week, I thought here is my chance to make the beetroot pepperoni, I've been intrigued by the idea since I saw it on diet dessert and dogs.

Beetroot Pepperoni from diet dessert and dogs
3-4 very small fresh beets, peeled and sliced extremely thin
1 Tbsp (15 ml) extra virgin olive oil, preferably organic
2 Tbsp (30 ml) Bragg’s liquid aminos OR tamari OR soy sauce
1/2 cup (120 ml) vegetable broth
1/4-1/2 tsp (1-2.5 ml) liquid smoke, to your taste*
1 tsp (5 ml) apple cider vinegar
2-3 drops plain stevia liquid or 1/4 tsp (1 ml) sugar
1/4 tsp (1 ml) garlic powder
1/4 tsp (1 ml) onion powder
1/4 tsp (1 ml) ground mustard
1/4 tsp (1 ml) fennel (ground is preferred)
1/8 tsp (.5 ml) sage
1/4 tsp (1 ml) smoked or regular paprika
Preheat oven to 325F (170 C).
Place everything except the beets in the bottom of a 9-inch (22.5 cm) square glass pan or a casserole dish and combine well.  Add the beet slices and toss to coat them all; spread them out as well as you can (overlapping slices is okay). 

Bake the slices, uncovered, for about 20 minutes, then remove from the oven and flip them over and around to re-coat them with marinade and switch the bottom slices to the top and top to the bottom as much as possible. Continue to bake and stir them up every 10-15 minutes until they have absorbed most of the marinade, are very soft, and begin to curl and crisp at the edges. Remove from oven and set aside until you need them for the pizza.

It was a bit time consuming to make, cooking for at least 60 minutes in total before it was ready and didn't taste exactly taste like pepperoni but had a lovely salty/smokey flavour.


We used half of it on our cream cheese pasta leftovers and then I had to make pizza. We both preferred it on pizza as it become slightly crispy. I purchased two ready made crusts to make the pizza. The Dovedail rice chia pizza bases from the health food store and the simply wise pizza crust from coles. The dovedail package contained 2 bases and the simply wise packet contained 3.


Here is the simply wise ones, which are smaller than the dovedail ones. I put the same topping on each pizza- Leggo's pizza sauce, cheddar cheezly, beetroot pepperoni slices, smoked tofu, pineapple pieces and capsicum. The toppings were a surprisingly good combination. The instructions said to bake the bases for 7-10 minutes but I ended up baking them for about 20 minutes.  These pizza bases are made from mostly rice flour, tapioca and potato starch. They also contain herbs in the actual base which we couldn't really taste.


They are thinner and kind of crunchy and Toby I agreed that we preferred this option as he said 'it's not bad for gluten free pizza'. Although it still kind of still felt like it was slightly under cooked in the middle.


I've used the same size plate so you can see the slightly bigger size difference with the dovedail bases. There are not as many ingredients in these as they mostly consist of rice flour and chia seeds so they appear to be the healthier option.


And here's an inside shot. The instructions didn't say how long to cook for, but I cooked these for about 20 minutes. These were fine, but in comparison they were quite doughy and kind of felt like we eating pizza on top of warm bread.


The simply wize bases were $6.45 from coles and I think the dovedail bases were a similar price if not slightly more.  While the dovedail bases were slightly larger in circumference and thicker there was only 2, so the 3 simply wize ones work out to be better value.  In our mind the simply wize were superior in terms of texture and they are also more convenient too since most coles seem to stock them in the health food section. We will definitely make them again. I'm embarrassed to say that we ate all 5 pizzas on Friday night but were extremely full. I think that 3 would be fine served with some salad and/or garlic bread for 2 regular eaters. Since Toby doesn't count :P
As soon as we received beetroot in our food co op box last week, I thought here is my chance to make the beetroot pepperoni, I've been intrigued by the idea since I saw it on diet dessert and dogs.

Beetroot Pepperoni from diet dessert and dogs
3-4 very small fresh beets, peeled and sliced extremely thin
1 Tbsp (15 ml) extra virgin olive oil, preferably organic
2 Tbsp (30 ml) Bragg’s liquid aminos OR tamari OR soy sauce
1/2 cup (120 ml) vegetable broth
1/4-1/2 tsp (1-2.5 ml) liquid smoke, to your taste*
1 tsp (5 ml) apple cider vinegar
2-3 drops plain stevia liquid or 1/4 tsp (1 ml) sugar
1/4 tsp (1 ml) garlic powder
1/4 tsp (1 ml) onion powder
1/4 tsp (1 ml) ground mustard
1/4 tsp (1 ml) fennel (ground is preferred)
1/8 tsp (.5 ml) sage
1/4 tsp (1 ml) smoked or regular paprika
Preheat oven to 325F (170 C).
Place everything except the beets in the bottom of a 9-inch (22.5 cm) square glass pan or a casserole dish and combine well.  Add the beet slices and toss to coat them all; spread them out as well as you can (overlapping slices is okay). 

Bake the slices, uncovered, for about 20 minutes, then remove from the oven and flip them over and around to re-coat them with marinade and switch the bottom slices to the top and top to the bottom as much as possible. Continue to bake and stir them up every 10-15 minutes until they have absorbed most of the marinade, are very soft, and begin to curl and crisp at the edges. Remove from oven and set aside until you need them for the pizza.

It was a bit time consuming to make, cooking for at least 60 minutes in total before it was ready and didn't taste exactly taste like pepperoni but had a lovely salty/smokey flavour.


We used half of it on our cream cheese pasta leftovers and then I had to make pizza. We both preferred it on pizza as it become slightly crispy. I purchased two ready made crusts to make the pizza. The Dovedail rice chia pizza bases from the health food store and the simply wise pizza crust from coles. The dovedail package contained 2 bases and the simply wise packet contained 3.


Here is the simply wise ones, which are smaller than the dovedail ones. I put the same topping on each pizza- Leggo's pizza sauce, cheddar cheezly, beetroot pepperoni slices, smoked tofu, pineapple pieces and capsicum. The toppings were a surprisingly good combination. The instructions said to bake the bases for 7-10 minutes but I ended up baking them for about 20 minutes.  These pizza bases are made from mostly rice flour, tapioca and potato starch. They also contain herbs in the actual base which we couldn't really taste.


They are thinner and kind of crunchy and Toby I agreed that we preferred this option as he said 'it's not bad for gluten free pizza'. Although it still kind of still felt like it was slightly under cooked in the middle.


I've used the same size plate so you can see the slightly bigger size difference with the dovedail bases. There are not as many ingredients in these as they mostly consist of rice flour and chia seeds so they appear to be the healthier option.


And here's an inside shot. The instructions didn't say how long to cook for, but I cooked these for about 20 minutes. These were fine, but in comparison they were quite doughy and kind of felt like we eating pizza on top of warm bread.


The simply wize bases were $6.45 from coles and I think the dovedail bases were a similar price if not slightly more.  While the dovedail bases were slightly larger in circumference and thicker there was only 2, so the 3 simply wize ones work out to be better value.  In our mind the simply wize were superior in terms of texture and they are also more convenient too since most coles seem to stock them in the health food section. We will definitely make them again. I'm embarrassed to say that we ate all 5 pizzas on Friday night but were extremely full. I think that 3 would be fine served with some salad and/or garlic bread for 2 regular eaters. Since Toby doesn't count :P
reade more... Résuméabuiyad